使用物理引擎matterjs实现键盘特效动画
前言
偶然间看到一个网站magickeyboard,觉得这个动画很炫酷。就收藏了一下,在稍微学习了一下matterjs后,打算跟着源码学习,弄懂并且自己实现一个。
准备
先安装matter-js和webpack,并且稍微配置一下webpack。
1 | |
Matterjs初体验
根据Matterjs官网的demo,可以知道Matterjs的使用主要分为几个步骤:
创建引擎
创建渲染器
创建物体
将物体添加到引擎的
world中执行渲染器
创建执行器runner,并运行引擎(如果没有这一步,则没有办法触发物理动画)
index.html
1 | |
1 | |
添加键盘事件,每次点击生成一个物体
1 | |
添加力
1 | |
上面的
vector就是力。y轴方向上,力会根据窗口高度变化的一个,而x轴方向上,力会随着时间的变化而发生变化,力的区间为[-0.02, 0.02],将它分成10部分,根据时间戳来获取x轴方向上的力。(Date.now() % 10) * 0.004 - 0.02
下面的演示用的里的区间是[-0.2, 0.2],(Date.now() % 10) * 0.04 - 0.2(为了看的效果明显点)

添加倾斜边界
添加倾斜边界,让弹出来的球能够慢慢消失。
1 | |
添加兜底边界
当我们添加倾斜边界时,球会越变越多,包括消失的球也没有进行处理。所以可以添加一个兜底边界,后面再添加碰撞事件,清除接触到兜底边界的小球。
下面的例子会先将倾斜边界变短,查看实际效果
1 | |

添加一个platform变量用来存储兜底边界,便于实现碰撞检测。
1 | |
位置设定
上面的实现会导致不论点击什么键,小球出现的位置都是固定的,所以进行一个位置设定的操作,来实现点击键盘后,位置和键盘上的位置差不多一样。
首先,需要构建一个二维数组,元素的值则是每一行键盘对应的顺序(功能键为
null)1
2
3
4
5
6
7
8
9
10
11
12
13
14const KEYS = [
// 字母键和符号键
['`', '1', '2', '3', '4', '5', '6', '7', '8', '9', '0', '-', '=', null],
[null, 'Q', 'W', 'E', 'R', 'T', 'Y', 'U', 'I', 'O', 'P', '[', ']', '\\'],
[null, 'A', 'S', 'D', 'F', 'G', 'H', 'J', 'K', 'L', ';', '\'', null],
[null, null, 'Z', 'X', 'C', 'V', 'B', 'N', 'M', ',', '.', '/', null, null],
// 数字键
[null, null, null, null, null, null, null, null, null, null, null, null, null, null, null, 'num-/', 'num-*', 'num--'],
[null, null, null, null, null, null, null, null, null, null, null, null, null, null, 'num-7', 'num-8', 'num-9', 'num-+'],
[null, null, null, null, null, null, null, null, null, null, null, null, null, null, 'num-4', 'num-5', 'num-6', null],
[null, null, null, null, null, null, null, null, null, null, null, null, null, null, 'num-1', 'num-2', 'num-3', null],
[null, null, null, null, null, null, null, null, null, null, null, null, null, null, null, 'num-0', null, 'num-.', null]
];遍历每一个键,设定好每个键的位置。
1
2
3
4
5
6
7
8
9
10
11
12
13
14
15
16
const positions = {};
// 生成键盘字母对应的位置
generatePositions();
function generatePositions() {
KEYS.forEach((row) => {
row.forEach((letter, i) => {
if (!letter) {
return; // 功能键,忽略
}
positions[letter] = ((i / row.length) + (0.5 / row.length)) * WIDTH;
})
})
}((i / row.length) + (0.5 / row.length)) * WIDTH:i是点在行中的索引,row.length是该行中点的总数,(i / row.length) * WIDTH的值就是该点应该在的位置,但是这样子得到的将不会是对应单元格的中心位置,而是左侧边缘的位置,所以还应该加半个单元格的宽度,即(0.5 / row.length) * WIDTH。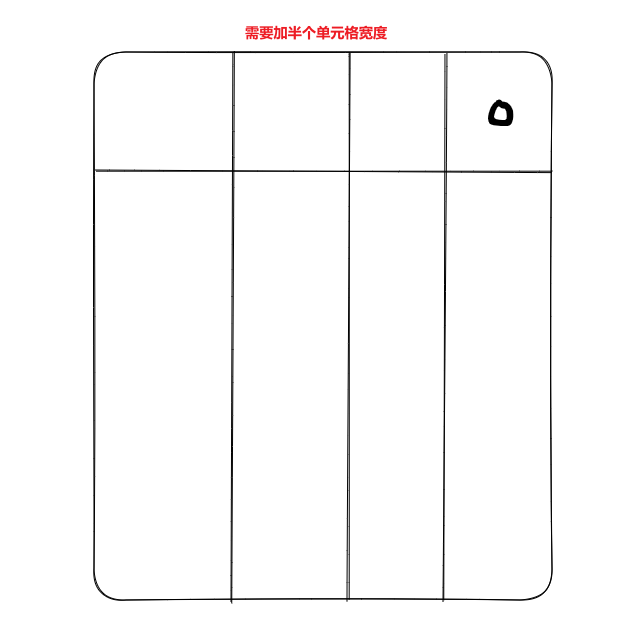
使用vkey库,将数字键变为
<num-0>的形式,用来与一般的区分,并且会将所有的英文变成大写。1
2
3
4
5
6
7
8
9
10
11
12
13
14
15
16
17
18
19
20
21
22
23
24
25
26
27
28document.body.addEventListener('keydown', (e) => {
let key = vkey[e.keyCode];
if (key == null) {
return;
}
key = key.replace(/</g, '').replace(/>/g, ''); // 将`<num-0>`形式变为`num-0`
if (key in positions) {
addLetter(key, positions[key], HEIGHT - 50);
}
})
function addLetter(key, x, y) {
const ball = Bodies.circle(x, y, 30, {
restitution: 0.9
});
const vector = {
x: (Date.now() % 10) * 0.004 - 0.02,
y: (-1 * HEIGHT / 3600)
};
Matter.Body.applyForce(ball, ball.position, vector);
Composite.add(engine.world, [ball]);
}
小球换成图片
通过render.sprite.texture来设置图片。
1 | |
\color{red}{还需要修改一下创建渲染器时的设置}
1 | |

变化边界长度,并隐藏
最下面的边界长度为WIDTH * 4,这样子为了避免内存泄漏,把一些球给移除。
1 | |
抽离初始化步骤,并在窗口大小变化时重新初始化
如果在串口大小变化时,不重新初始化,就会导致一些字符并不会在窗口中看得见。
1 | |
添加音效
1 | |
1 | |
预加载图片
当实际部署上线后,会发现,一开始点击键盘时,是没有反应的。因为当我们点击时,才去请求对应图片。所以可以做一个预加载的操作,优化一下。
预加载就可以通过新建Image,并设置src值来实现
1 | |
当遍历设置字符位置时,就能够进行一个预加载操作。
1 | |
添加下雨模式
通过使用lastKeys来记录点击过的字符,当最后点击的字符为rain时(不区分大小写),开启一个下雨模式。而下雨模式也很简单,只需要重新设置力vector,和球的坐标即可。
1 | |
1 | |

完整代码
1 | |
1 | |