MutationObserver接口(二) 观察范围
观察范围
上一节,我们使用MutationObserver时,都只是观察节点的属性。但是实际上并不仅仅是只能观察节点的属性,还可以观察子节点、子树等。只需要调用observe()方法时,第二个参数添加对应配置即可。
| 属性 |
说明 |
attributes |
布尔值,表示观察目标节点的属性变化 |
attributeFilter |
字符串数组,表示要观察哪些属性的变化。(类似白名单,只有白名单的才会被观察) |
attributeOldValue |
布尔值,表示MutationRecord是否记录变化之间的数据。**设置该属性为true,会将attributes的值转换为true**。 |
characterData |
布尔值,表示观察文本节点。 |
characterDataOldValue |
布尔值,表示MutationRecord是否记录变化之间的数据。和attributeOldValue一样,对应characterData |
childList |
布尔值,表示观察子节点 |
subtree |
布尔值。表示观察目标节点及其子树。如果为false,则之观察目标节点的变化,为true |
观察属性
观察属性就是上一节一直在用的。
1
2
3
4
5
6
7
8
9
| const observer = new MutationObserver((mutationsRecords) => {
console.log(mutationsRecords)
})
observer.observe(document.body, {
attributes: true
})
document.body.setAttribute('name', 'clz')
|
如果我们不需要观察所有属性,而只是观察某个或某几个属性,可以使用 attributeFilter属性来设置白名单,值是一个属性名数组。
1
2
3
4
5
6
7
8
9
10
11
12
13
| let observer = new MutationObserver((mutationRecords) => {
console.log(mutationRecords)
})
observer.observe(document.body, {
attributeFilter: ['name', 'age']
})
document.body.setAttribute('name', 'clz')
document.body.setAttribute('age', 21)
document.body.setAttribute('job', 'FontEnd-Coder')
|
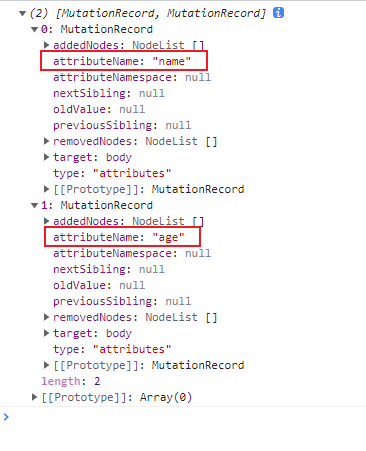
上面设置了name和age为白名单,即只观察name和age属性,所以后面设置job属性不会触发回调。
从上图,我们可以看到一个oldValue属性,它就是用来保存属性原来的值的。而默认是不会保存属性原来的值的,如果想要记录原来的值,可以将 attributeOldValue属性设置为 true。**设置该属性为true,会将attributes的值转换为true**。
1
2
3
4
5
6
7
8
9
10
11
| const observer = new MutationObserver((mutationRecords) => {
mutationRecords.map(mutationRecord => console.log(mutationRecord.oldValue))
})
observer.observe(document.body, {
attributeOldValue: true
})
document.body.setAttribute('name', 'clz')
document.body.setAttribute('name', 'czh')
|

设置name属性为clz的时候打印原来的值,原来没有值,所以打印null,设置为czh的时候打印原来的值czh。
观察文本节点
MutationObserver可以观察文本节点。
1
2
3
4
5
6
7
8
9
10
11
12
13
| const observer = new MutationObserver((mutationRecords) => {
console.log(mutationRecords)
})
document.body.firstChild.textContent = 'hello'
observer.observe(document.body.firstChild, {
characterData: true
})
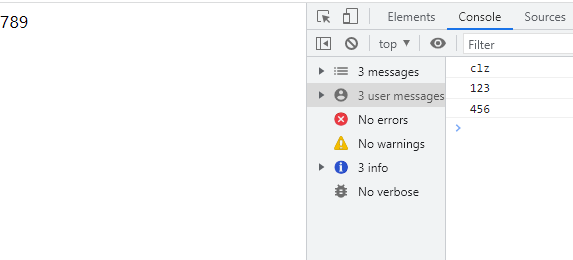
document.body.firstChild.textContent = '123'
document.body.firstChild.textContent = '456'
document.body.firstChild.textContent = '789'
|
如果想要记录原来的值,可以将 characterDataOldValue属性设置为 true。**设置该属性为true,会将characterData的值转换为true**。
1
2
3
4
5
6
7
8
9
10
11
12
13
14
| const observer = new MutationObserver((mutationRecords) => {
mutationRecords.map(mutationRecord => console.log(mutationRecord.oldValue))
})
document.body.firstChild.textContent = 'clz'
observer.observe(document.body.firstChild, {
characterDataOldValue: true
})
document.body.firstChild.textContent = '123'
document.body.firstChild.textContent = '456'
document.body.firstChild.textContent = '789'
|
注意:innerText和textContent有点点相似,但是innerText可能会引发一些问题。
首先,innerText是元素节点的属性,表示一个节点及其后代的“渲染”文本内容。而textContent是节点的属性,表示节点的一个节点及其后代的文本内容。
举个小例子,说明他们两的区别。
1
2
3
4
5
6
7
8
9
10
11
12
13
14
15
16
17
18
19
20
21
22
23
24
25
26
| <body>
<div>
<span>
123
</span>
<span style="display:none">
456
</span>
</div>
<script>
const div = document.querySelector('div')
console.log(div.innerText)
console.log(div.textContent)
console.log('%c%s', 'color:red;font-size:24px', '============')
const divChild = div.firstChild
console.log(divChild.textContent)
console.log(divChild.innerText)
divChild.textContent = '456'
</script>
</body>
|
差异:
innerText属性不会获取display为none的隐藏元素,而textContent会获取。innerText没有格式,而textContent有格式- 文本节点没有
innerText属性
从上面可以看到,innerText属性不会获取display为none的隐藏元素,而textContent会获取。也就是说,innetText属性值的获取会触发回流,因为它需要考虑到CSS样式(如display),而textContent只是单纯读取文本内容,所以不会发生回流。
当我们观察节点时修改的是innerText,而不是textContent的话,会引发不一样的情况(个人认为算bug了,如果有了解原因的小伙伴,可以评论交流)
另外红宝书不建议使用innerText,但是,明知山有虎,偏向虎山行。(了解使用后会有什么隐患)
1
2
3
4
5
6
7
8
9
10
| const observer = new MutationObserver(
(mutationRecords) => mutationRecords.map((x) => console.log(x.oldValue))
);
document.body.innerText = 'clz'
observer.observe(document.body.firstChild, { characterDataOldValue: true });
document.body.firstChild.textContent = '123'
document.body.firstChild.textContent = '789'
|
观察前设置的innerText值也能被观察到
oldValue不再是旧值,而是设置的新值
上面开始观察后,使用的是textContent,因为使用innerText又会导致另一个bug发生。
1
2
3
4
5
6
7
8
9
10
11
| const observer = new MutationObserver(
(mutationRecords) => mutationRecords.map((x) => console.log(x.oldValue))
);
document.body.innerText = 'clz'
observer.observe(document.body.firstChild, { characterDataOldValue: true });
document.body.firstChild.textContent = '123'
document.body.innerText = '456'
document.body.firstChild.textContent = '789'
|
- 开始观察后,修改
innerText属性会导致观察失效。包括开始观察后innerText之前和之后的。
即使不混用,也还是有问题。
1
2
3
4
5
6
7
8
9
10
11
| const observer = new MutationObserver(
(mutationRecords) => mutationRecords.map((x) => console.log(x.oldValue))
);
document.body.innerText = 'clz'
observer.observe(document.body.firstChild, { characterDataOldValue: true });
document.body.innerText = '123'
document.body.innerText = '456'
document.body.innerText = '789'
|
上面的代码不会打印任何东西。所以**尽可能不要使用innerText,而是使用textContent**。
观察子节点
MutationObserver还可以观察目标节点子节点的添加和移除,只需要将childList属性设置为true即可。
1
2
3
4
5
6
7
8
9
10
11
12
13
14
15
16
| <body>
<div id="box"></div>
<script>
const box = document.getElementById('box')
const observer = new MutationObserver(
(mutationRecords) => console.log(mutationRecords)
);
observer.observe(box, { childList: true })
box.appendChild(document.createElement('span'))
box.innerHTML = '<div></div>'
</script>
</body>
|
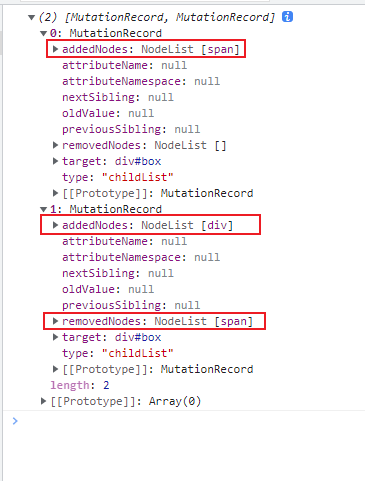
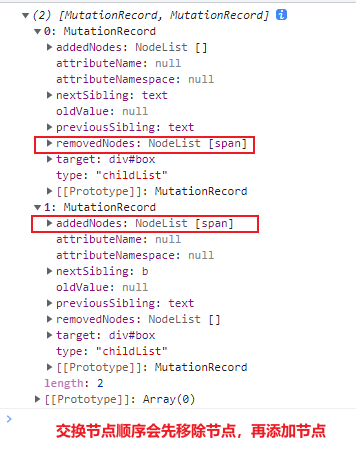
交换子节点顺序会导致发生两次变化,因为交换子节点顺序实际上有两个步骤,第一次是节点被移除,第二次是节点被添加。
1
2
3
4
5
6
7
8
9
10
11
12
13
14
15
16
17
18
19
| <body>
<div id="box">
<b>1</b>
<span>2</span>
</div>
<script>
const box = document.getElementById('box')
const observer = new MutationObserver(
(mutationRecords) => console.log(mutationRecords)
);
observer.observe(box, { childList: true })
box.insertBefore(box.lastElementChild, box.firstElementChild)
</script>
</body>
|
观察子树
MutationObserver可以观察子树,只需要将subtree属性设置为true即可。
1
2
3
4
5
6
7
8
9
10
11
12
13
14
15
16
17
18
19
20
21
| <body>
<div id="box">
<div>1</div>
<span>2</span>
</div>
<script>
const box = document.getElementById('box')
const observer = new MutationObserver(
(mutationRecords) => console.log(mutationRecords)
);
observer.observe(box, {
attributes: true,
subtree: true
});
box.firstElementChild.setAttribute('haha', 'haha')
box.firstElementChild.appendChild(document.createElement('b'))
</script>
</body>
|

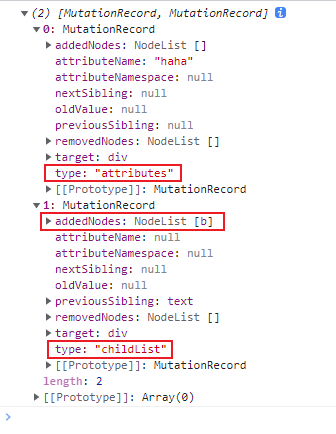
但是,从上面,我们可以发现,只有修改属性才会被观察到,添加节点时并没有被观察到,那是不是观察子树不能观察节点的添加和移除呢?
并不是,这里只是因为分工明确,subtree观察子树(不包括节点的添加和删除),childList观察子节点,所以需要同时实现的话,那就需要两个属性都有。
1
2
3
4
5
6
7
8
9
10
11
12
13
14
| const box = document.getElementById('box')
const observer = new MutationObserver(
(mutationRecords) => console.log(mutationRecords)
);
observer.observe(box, {
attributes: true,
subtree: true,
childList: true
});
box.firstElementChild.setAttribute('haha', 'haha')
box.firstElementChild.appendChild(document.createElement('b'))
|