Vue Router 深入学习(一)
之前的笔记:Vue 路由
通过阅读文档,自己写一些 demo 来加深自己的理解。(主要针对 Vue3)
1. 动态路由匹配
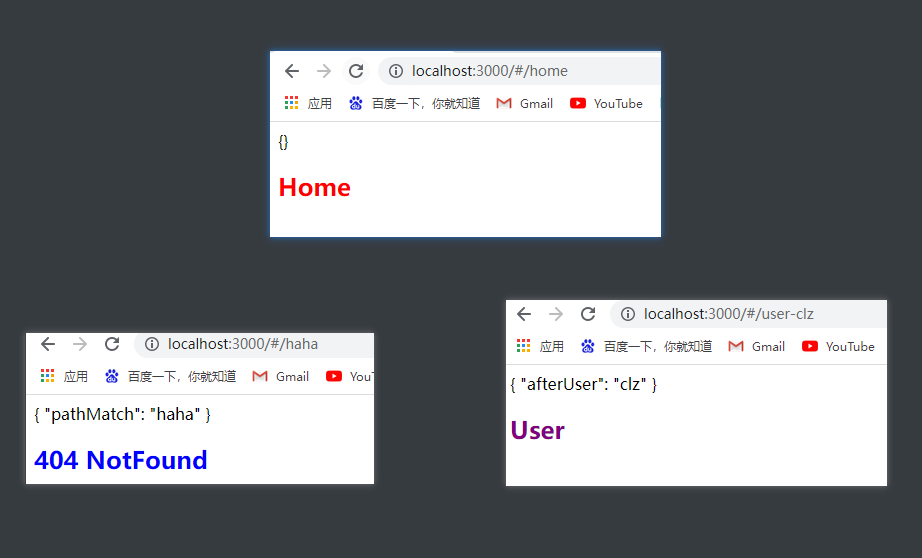
1.1 捕获所有路由(404 路由)
1
2
3
4
5
6
| const routes = [
{ path: "/:pathMatch(.*)*", name: "NotFound", component: NotFound },
{ path: "/user-:afterUser(.*)", component: UserGeneric },
];
|
使用:
1
2
3
4
5
6
7
8
9
10
11
12
13
14
15
16
17
18
19
20
21
22
23
24
25
26
27
28
29
30
31
32
| import { createRouter, createWebHashHistory } from "vue-router";
const routes = [
{
path: "/",
redirect: "/home",
},
{
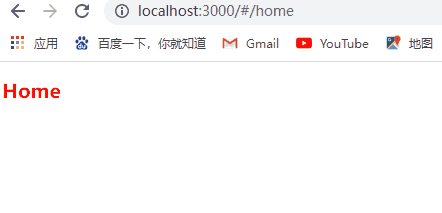
path: "/home",
name: "Home",
component: () => import("../components/Home.vue"),
},
{
path: "/user-:afterUser(.*)",
name: "User",
component: () => import("../components/User.vue"),
},
{
path: "/:pathMatch(.*)*",
name: "NotFound",
component: () => import("../components/NotFound.vue"),
},
];
const router = new createRouter({
history: createWebHashHistory(),
routes,
});
export default router;
|
app.vue
1
2
3
4
5
6
7
8
9
10
| <template>
{{ route.params }}
<router-view></router-view>
</template>
<script setup>
import { useRoute } from "vue-router";
const route = useRoute();
</script>
|
2 路由的匹配语法
主要是通过正则表达式的语法来实现
2.1 在参数中自定义正则
语法:
1
2
3
4
5
6
| const routes = [
{ path: "/:orderId(\\d+)" },
{ path: "/:productName" },
];
|
实践:
路由配置:
1
2
3
4
5
6
7
8
9
10
11
12
13
14
15
16
17
18
19
20
21
22
23
24
25
26
27
28
29
30
| import { createRouter, createWebHashHistory, useRoute } from "vue-router";
const routes = [
{
path: "/",
redirect: "/home",
},
{
path: "/home",
name: "Home",
component: () => import("../components/Home.vue"),
},
{
path: "/user/:userid(\\d+)",
name: "UserId",
component: () => import("../components/UserId.vue"),
},
{
path: "/user/:username",
name: "UserName",
component: () => import("../components/UserName.vue"),
},
];
const router = new createRouter({
history: createWebHashHistory(),
routes,
});
export default router;
|
2.2 可重复的参数
可以使用 *(0 个或多个)和 +(1 个或多个)将参数标记为可重复
语法:
1
2
3
4
5
6
| const routes = [
{ path: "/:chapters+" },
{ path: "/:chapters*" },
];
|
实践:
*:
1
2
3
4
5
6
7
8
9
10
11
12
13
14
15
16
| import { createRouter, createWebHashHistory, useRoute } from "vue-router";
const routes = [
{
path: "/:chapters*",
name: "Chapters",
component: () => import("../components/Chapters.vue"),
},
];
const router = new createRouter({
history: createWebHashHistory(),
routes,
});
export default router;
|
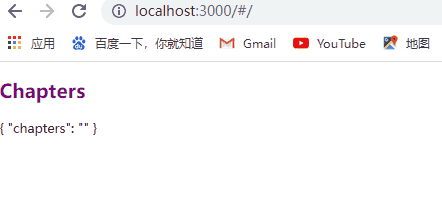
+:
2.3 可选参数
使用 ? 修饰符(0 个或 1 个)将一个参数标记为可选
语法:
1
2
3
4
5
6
| const routes = [
{ path: "/users/:userId?" },
{ path: "/users/:userId(\\d+)?" },
];
|
实践:
1
2
3
4
5
6
7
8
9
10
11
12
| const routes = [
{
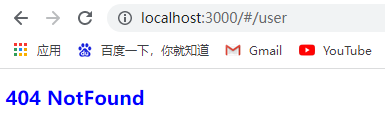
path: "/user/:userid(\\d+)?",
name: "User",
component: () => import("../components/User.vue"),
},
{
path: "/:pathMatch(.*)*",
name: "NotFound",
component: () => import("../components/NotFound.vue"),
},
];
|
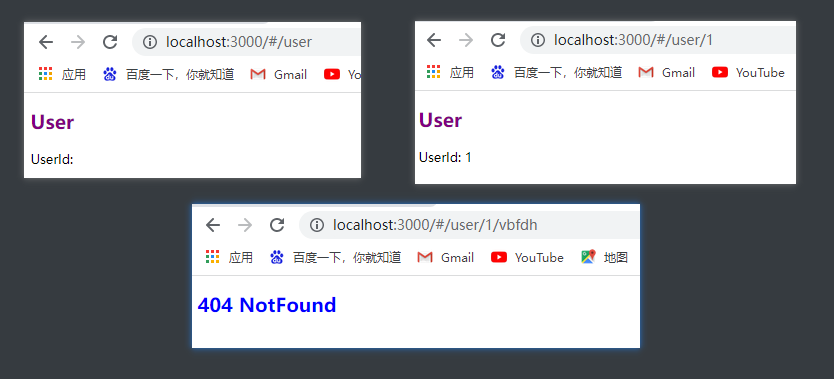
如果没加可选限制,那么访问/user 时也会匹配到 404 去
3. 编程式导航
params 不能与 path 一起使用,而应该使用name(命名路由)
1
2
3
4
5
6
7
8
9
10
11
12
13
14
15
16
17
18
19
20
21
22
23
24
25
26
27
28
29
| <template>
<router-view></router-view>
</template>
<script>
import { useRoute, useRouter } from "vue-router";
export default {
setup() {
const route = useRoute();
const router = useRouter();
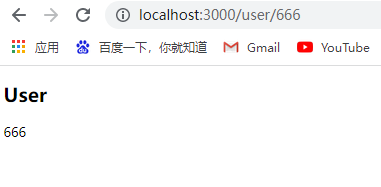
router.push({
name: "user",
params: {
userid: 666,
},
});
},
};
</script>
|
3.1 替换当前位置
不会向 history添加新纪录,而是替换当前的记录
声明式:
1
| <router-link to="/home" replace>home</router-link>
|
编程式:
1
2
3
4
5
6
7
8
9
| router.replace({
path: "/home",
});
|
4. 命名视图
需要同时同级展示多个视图,而不是嵌套展示时,命名视图就能够派上用场了
首先路由配置需要使用 components配置
1
2
3
4
5
6
7
8
9
10
11
| const routes = [
{
path: "/",
name: "home",
components: {
default: () => import("./views/First.vue"),
second: () => import("./views/Second.vue"),
third: () => import("./views/Third.vue"),
},
},
];
|
使用 router-view时,添加上name属性即可
1
2
3
| <router-view></router-view>
<router-view name="second"></router-view>
<router-view name="third"></router-view>
|
示例:
命名视图
5. 路由组件传参
首先可通过 route来实现路由传参,不过也可以通过 props配置来开启 props传参
1
2
3
4
5
6
7
8
9
10
11
12
13
14
| import { createRouter, createWebHistory } from "vue-router";
const routes = [
{
path: "/user/:id",
component: () => import("../components/User.vue"),
props: true,
},
];
export default new createRouter({
history: createWebHistory(),
routes,
});
|
通过 props获取参数
1
2
3
4
5
6
7
8
9
10
| <template>
<h2>User</h2>
<p>{{ id }}</p>
</template>
<script setup>
const props = defineProps(["id"]);
</script>
<style></style>
|
更多
参考链接:Vue Router