python(五)


python(五)

1. GUI 编程

tkinter 标准库

1
2
3
4
5
6
7
8
9
10
11
12
import tkinter

def show():
print(1)

root = tkinter.Tk() # 创建tkinter应用程序主窗口
button = tkinter.Button(root, text="点击", command=show)
button.place(x=10, y=20, width=100, height=100)

root.mainloop() # 启动主循环,启动应用程序


2. 多线程与多线程编程

2.1Thread 对象

threading 模块是 Python 支持多线程编程的重要模块

Thread 类支持使用两种方法来创建线程

  • 使用一个可调用对象做参数创建对象
  • 继承 Thread 类,并在派生类中重写__init__()run()方法

创建线程对象以后,可以调用它的 start()方法来启动,该方法自动调用该类对象的 run()方法。

创建多线程

1
2
3
4
5
6
7
8
9
10
11
12
13
14
import threading
import time

def fun1(x, y):
for i in range(x, y):
print(i)
time.sleep(1)


t1 = threading.Thread(target=fun1, args=(15, 20))
t1.start()

t2 = threading.Thread(target=fun1, args=(5, 10))
t2.start()

结果不一,因为多线程不是同步执行,而是异步执行

2.2 线程同步技术

2.2.1 Lock/RLock 对象

一个锁有两个状态:locked 和 unlocked。

如果锁处于 unlocked 状态,acquire()方法将其修改为 locked 并立即返回,如果锁已经处于 locked 状态,则阻塞当前线程并等待其他线程锁解锁,然后将其修改为 locked 并立即返回。

release()方法用来将锁的状态由 locked 修改为 unclocked 并立即返回,如果锁的状态已经是 unclocked,调用该方法会抛出异常

RLock 对象可被同一个线程**acquire()**多次,RLock 对象的 acquire()/release()调用对可以嵌套,仅当最后一个或最外层的 release()执行结束后,锁才会被设置为 unclocked 状态

1
2
3
4
5
6
7
8
9
10
11
12
13
14
15
16
17
18
19
20
21
22
23
import threading
import time

class myThread(threading.Thread):
def __init__(self):
threading.Thread.__init__(self)
def run(self):
global x
lock.acquire() # 上锁, 没开锁之前,会阻塞其他线程,直到开锁
for i in range(3):
x += i
time.sleep(2)
print(x)
lock.release() # 开锁

lock = threading.RLock()
t1 = []
for i in range(5):
t = myThread()
t1.append(t)
x = 0
for i in t1:
i.start()

2.2.2 Condition 对象

使用 Condition 对象可以在某些事件触发后才处理数据,可以用于不同线程之间的通信或通知,以实现更高级别的同步。

生产者消费者问题

1
2
3
4
5
6
7
8
9
10
11
12
13
14
15
16
17
18
19
20
21
22
23
24
25
26
27
28
29
30
31
32
33
34
35
36
37
38
39
40
41
42
43
import threading

class Producer(threading.Thread):
def __init__(self, threadName):
threading.Thread.__init__(self, name=threadName)
def run(self):
global x
con.acquire() # 类似上锁
if x == 20:
con.wait()
print('Producer: ', end='')
for i in range(20):
print(x, end=' ')
x = x + 1
print(x)
con.notify() # 唤醒在等待的单个线程
con.release() # 类似开锁

class Consumer(threading.Thread):
def __init__(self, threadName):
threading.Thread.__init__(self, name=threadName)
def run(self):
global x
con.acquire()
if x == 0:
con.wait()
print('Consumer: ', end=' ')
for i in range(20):
print(x, end=' ')
x = x - 1
print(x)
con.notify()
con.release()

con = threading.Condition()
x = 0
p = Producer('Producer')
c = Consumer('Consumer')
p.start()
c.start()
p.join()
c.join()
print('After Producer and Consumer all done: ', x)

2.2.3 queue 对象

queue 模块实现了多生产者-多消费者队列,非常适合需要在多个线程之间进行信息交换的场所。

1
2
3
4
5
6
7
8
9
10
11
12
13
14
15
16
17
18
19
20
21
22
23
24
25
26
27
28
29
30
31
32
33
34
35
36
import threading
import time
import queue

class Producer(threading.Thread):
def __init__(self, threadName):
threading.Thread.__init__(self, name=threadName)
def run(self):
global myqueue
myqueue.put(self.name) # 在队列尾部追加元素
print(self.name, 'put ', self.name, ' to queue.')

class Consumer(threading.Thread):
def __init__(self, threadName):
threading.Thread.__init__(self, name=threadName)
def run(self):
global myqueue
print(self.name, 'get ', myqueue.get(), ' from queue.') # get()获取队列头部的元素

myqueue = queue.Queue()
plist = []
clist = []

for i in range(10):
p = Producer('Producer' + str(i))
plist.append(p)
c = Consumer('Consumer'+str(i))
clist.append(c)

for i in plist:
i.start()
i.join()

for i in clist:
i.start()
i.join()

2.3 多进程编程

2.3.1 创建与启动进程

  • 通过创建 Process 对象来创建一个进程
1
2
3
4
5
6
7
8
9
10
11
12
13
14
15
16
17
from multiprocessing import Process
import os


def f(name):
print('module name: ', __name__)
print('parent process: ', os.getppid()) # 查看父进程ID
print('process id: ', os.getpid()) # 查看当前进程ID

print('hello ', name)


if __name__ == '__main__':
p = Process(target=f, args=('bob',))
p.start()
p.join()

  • 创建自定义类并继承 Process 类,并实现 run()方法
1
2
3
4
5
6
7
8
9
10
11
12
13
from multiprocessing import Process

class MyProcess(Process):
def __init__(self):
Process.__init__(self)

def run(self):
print('ok')


if __name__ == '__main__':
p = MyProcess()
p.start()

3. 网络编程

3.1 UDP 编程

接收端代码:

1
2
3
4
5
6
7
8
9
10
11
12
import socket
s = socket.socket(socket.AF_INET, socket.SOCK_DGRAM)

s.bind(('', 5000))
while True:
data, addr = s.recvfrom(1024)
data = data.decode()

print('received message:{0} from {1[1]} on {1[0]}'.format(data, addr))
if data.lower() == 'bye':
break
s.close()

发送端代码:

1
2
3
4
5
6
7
8
9
10
11
12
import socket
import sys

s = socket.socket(socket.AF_INET, socket.SOCK_DGRAM)

while True:
message = input('请输入要发送的信息: ')
s.sendto(message.encode(), ('127.0.0.1', 5000))
if message == 'bye':
break

s.close()

输入 bye 会结束收发信息

3.2 TCP 编程

服务端:

1
2
3
4
5
6
7
8
9
10
11
12
13
14
15
16
17
18
19
20
21
22
23
24
25
26
import socket

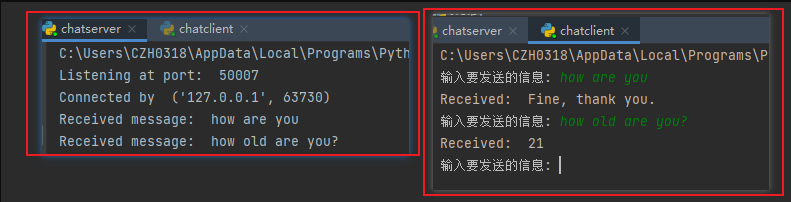
words = {'how are you' : 'Fine, thank you.', 'how old are you?' : '21',
'what is your name?' : 'czh', "what's your name?" : 'CZH',
'where do you work?' : 'Shenzhen', 'bye': 'bye'}

HOST = ''
PORT = 50007
s = socket.socket(socket.AF_INET, socket.SOCK_STREAM)

s.bind((HOST, PORT))

s.listen(1)
print('Listening at port: ', PORT)
conn, addr = s.accept()
print('Connected by ', addr)
while True:
data = conn.recv(1024).decode()
if not data:
break
print('Received message: ', data)
conn.sendall(words.get(data, 'Nothing').encode())

conn.close()
s.close()

客户端:

1
2
3
4
5
6
7
8
9
10
11
12
13
14
15
16
17
18
19
20
import sys
import socket

HOST = '127.0.0.1'
PORT = 50007

s = socket.socket(socket.AF_INET, socket.SOCK_STREAM)
try:
s.connect((HOST, PORT))
except Exception as e:
print('Server not found or not open')
sys.exit()
while True:
c = input('输入要发送的信息: ')
s.sendall(c.encode())
data = s.recv(1024).decode()
print('Received: ', data)
if c.lower() == 'bye':
break
s.close()

先运行服务端程序,开始监听后,再运行客户端程序,可以实现超简单的自动回复功能。

image-20220123210445377

3.3 简单网页内容爬取

1
2
3
4
5
6
import urllib.request

fp = urllib.request.urlopen(r'https://13535944743.github.io/')
# print(fp.read(100))
print(fp.read().decode())
fp.close()

文章作者: 赤蓝紫
版权声明: 本博客所有文章除特別声明外,均采用 CC BY 4.0 许可协议。转载请注明来源 赤蓝紫 !
评论
  目录