Express 实战(一) 项目结构搭建及验证、加密
开源项目:
RESTful 接口设计规范
最终结果:realworld-api-express-practise-
1. 创建项目
1
2
3
4
| mkdir realworld-api-express
cd realworld-api-express
npm init -y
npm install express
|
目录结构:
1
2
3
4
5
6
7
8
9
10
11
12
| .
├── node_modules npm安装的第三方包目录,使用 npm 装包会自动创建
├── config # 配置文件
| ├── config.default.js
├── controller # 解析用户的输入,处理后返回相应的结果
├── model # 数据持久层
├── middleware # 中间件
├── router # 配置URL路由
├── util # 工具模块
├── app.js 服务端程序入口文件,执行该文件会启动我们的 Web 服务器
├── package.json 项目包说明文件,存储第三方包依赖等信息
└── package-lock.json npm的包锁定文件,用来锁定第三方包的版本和提高npm下载速度
|
3. 配置常用中间件
- 解析请求体
- express.json()
- express.urlencoded()
- 日志输出
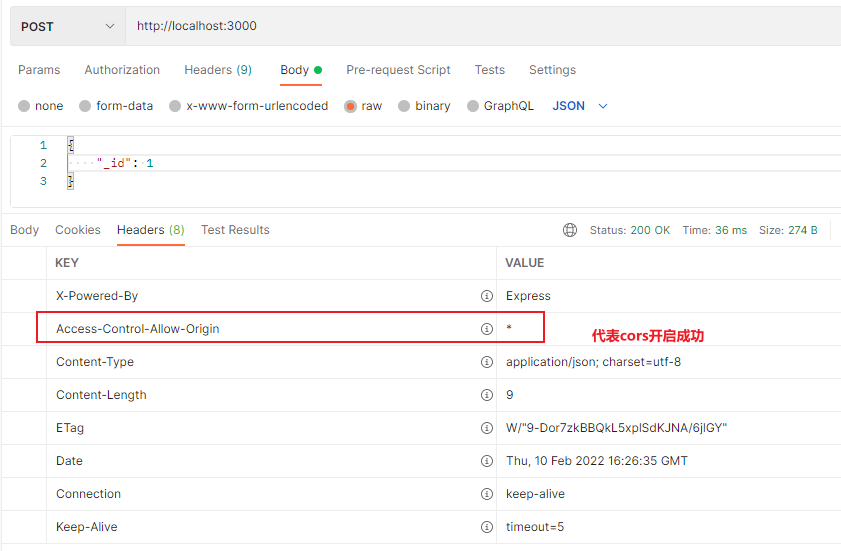
- 提供跨域资源请求
1
2
3
4
5
6
7
8
9
10
11
12
13
14
15
16
17
18
19
20
21
22
23
24
25
| const express = require("express");
const morgan = require("morgan");
const cors = require("cors");
const app = express();
app.use(morgan("dev"));
app.use(express.json());
app.use(express.urlencoded());
app.use(cors());
const PORT = process.env.PORT || 3000;
app.post("/", (req, res) => {
res.send(req.body);
});
app.listen(PORT, () => {
console.log(`Server is running at http://localhost:${PORT}`);
});
|
4. 路由设计
接口文档
用户相关路由(user.js):
1
2
3
4
5
6
7
8
9
10
11
12
13
14
15
16
17
18
19
20
21
22
23
24
25
26
27
28
29
30
31
32
33
34
35
36
37
38
39
40
41
| const express = require("express");
const router = express.Router();
router.post("/users/login", async (req, res, next) => {
try {
res.send("用户登录");
} catch (err) {
next(err);
}
});
router.post("/users", async (req, res, next) => {
try {
res.send("用户注册");
} catch (err) {
next(err);
}
});
router.get("/user", async (req, res, next) => {
try {
res.send("获取当前用户");
} catch (err) {
next(err);
}
});
router.put("/user", async (req, res, next) => {
try {
res.send("更新用户");
} catch (err) {
next(err);
}
});
module.exports = router;
|
index.js
1
2
3
4
5
6
7
8
9
10
11
| const express = require("express");
const router = express.Router();
router.use(require("./user"));
router.use("/profiles", require("./profile"));
module.exports = router;
|
app.js 挂载路由级别中间件
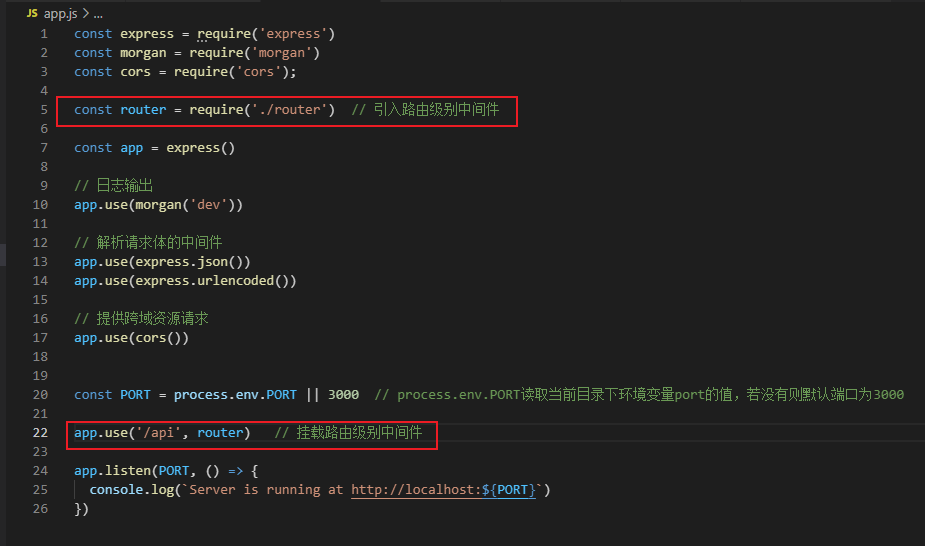
其他路由做法类似
5. 提取控制器模块
简单来说,就是把路由处理的回调函数单独抽出来,放到另一个地方,方便维护等操作。
示例(userController):
1
2
3
4
5
6
7
8
|
exports.login = async (req, res, next) => {
try {
res.send("用户登录");
} catch (err) {
next(err);
}
};
|

再优化一下(将控制器封装成类)
1
2
3
4
5
6
7
8
9
10
11
12
13
14
15
16
17
18
19
20
21
22
23
24
25
26
27
28
29
30
31
32
33
34
35
36
37
38
39
| class userController {
async login(req, res, next) {
try {
res.send("用户登录");
} catch (err) {
next(err);
}
}
async register(req, res, next) {
try {
res.send("用户注册");
} catch (err) {
next(err);
}
}
async getCurrentUser(req, res, next) {
try {
res.send("获取当前用户");
} catch (err) {
next(err);
}
}
async updateUser(req, res, next) {
try {
res.send("更新用户");
} catch (err) {
next(err);
}
}
}
module.exports = new userController();
|
6. 配置错误处理中间件
error-handler
1
2
3
4
5
6
7
8
| module.exports = () => {
return (err, req, res, next) => {
res.status(500).json({
error: err.message,
});
};
};
|
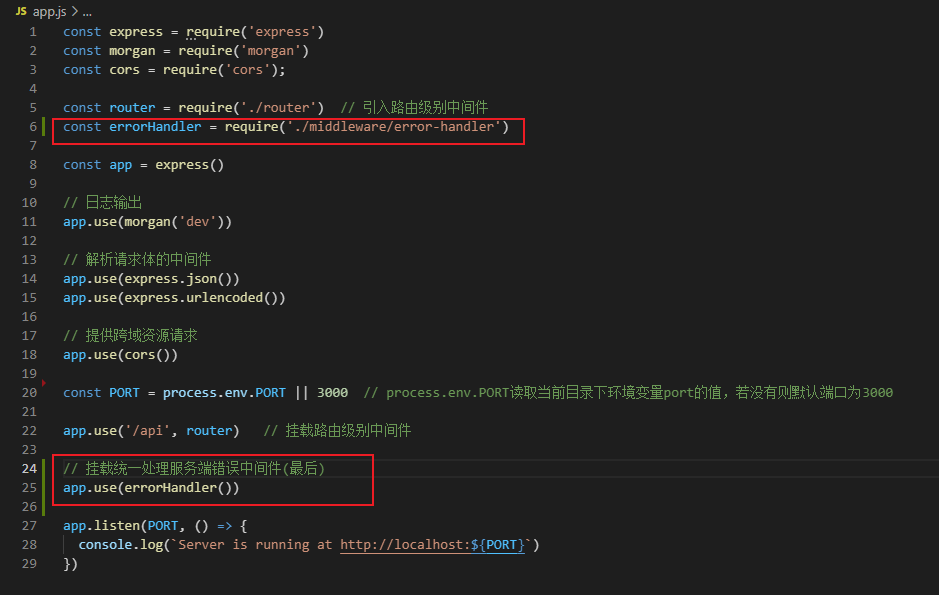
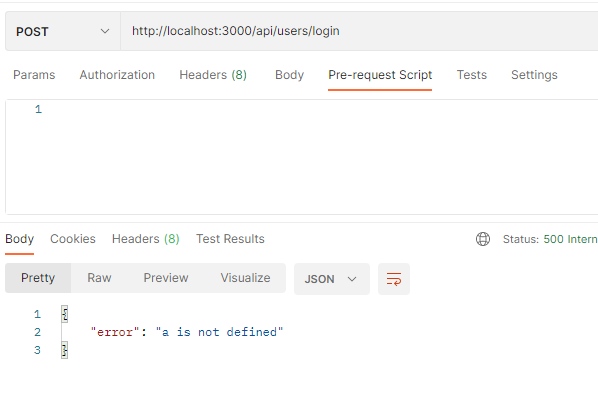
错误处理中间件应该在最后才挂载
测试: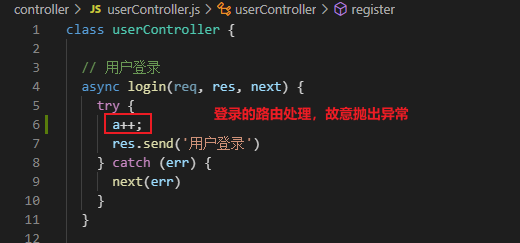
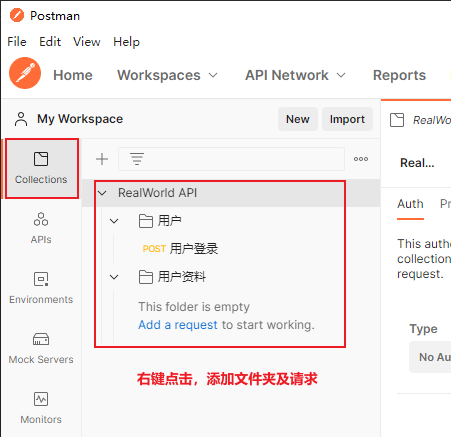
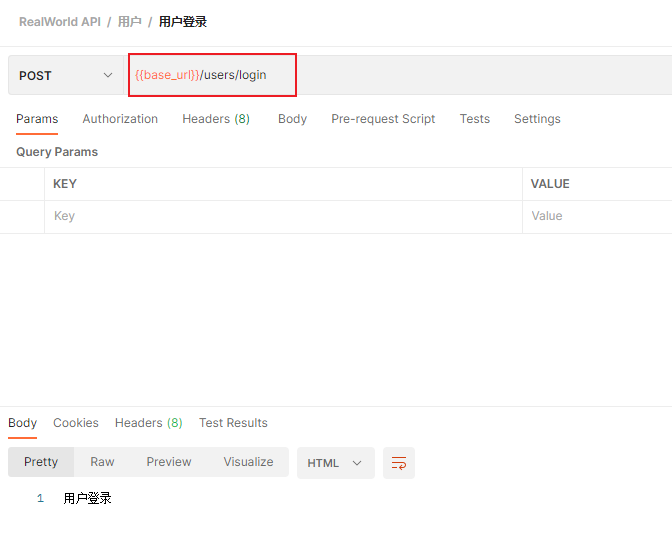
7. 统一管理测试接口(postman)
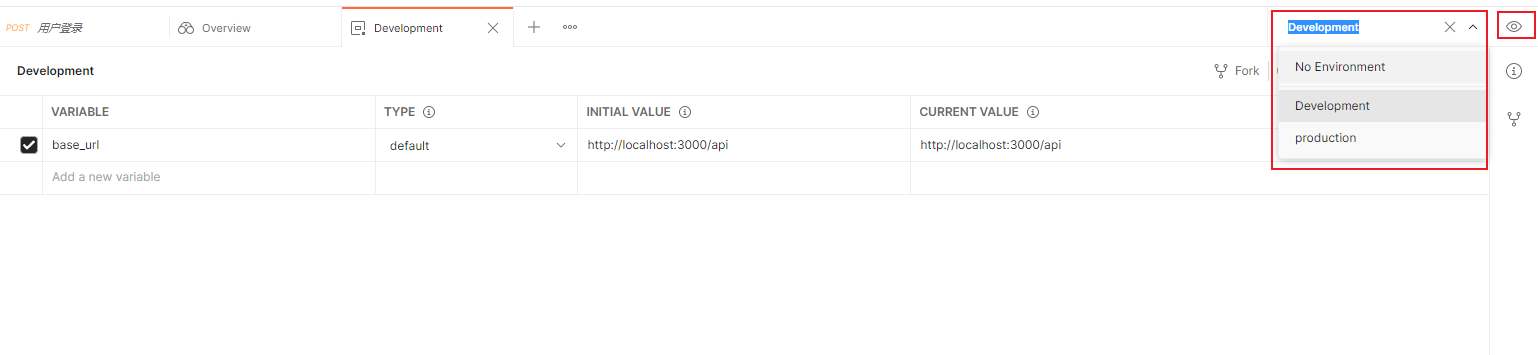
选择对应环境(Development 或 Production),没有则点击 No Environment,然后点击小眼睛,添加环境
设置基础路径(选择环境后,点击小眼睛进行编辑,如下图所示)
8. 使用 mongodb 数据库
8.1 安装 mongodb
MongoDB Community Download | MongoDB
先打开 MongoDB Compass
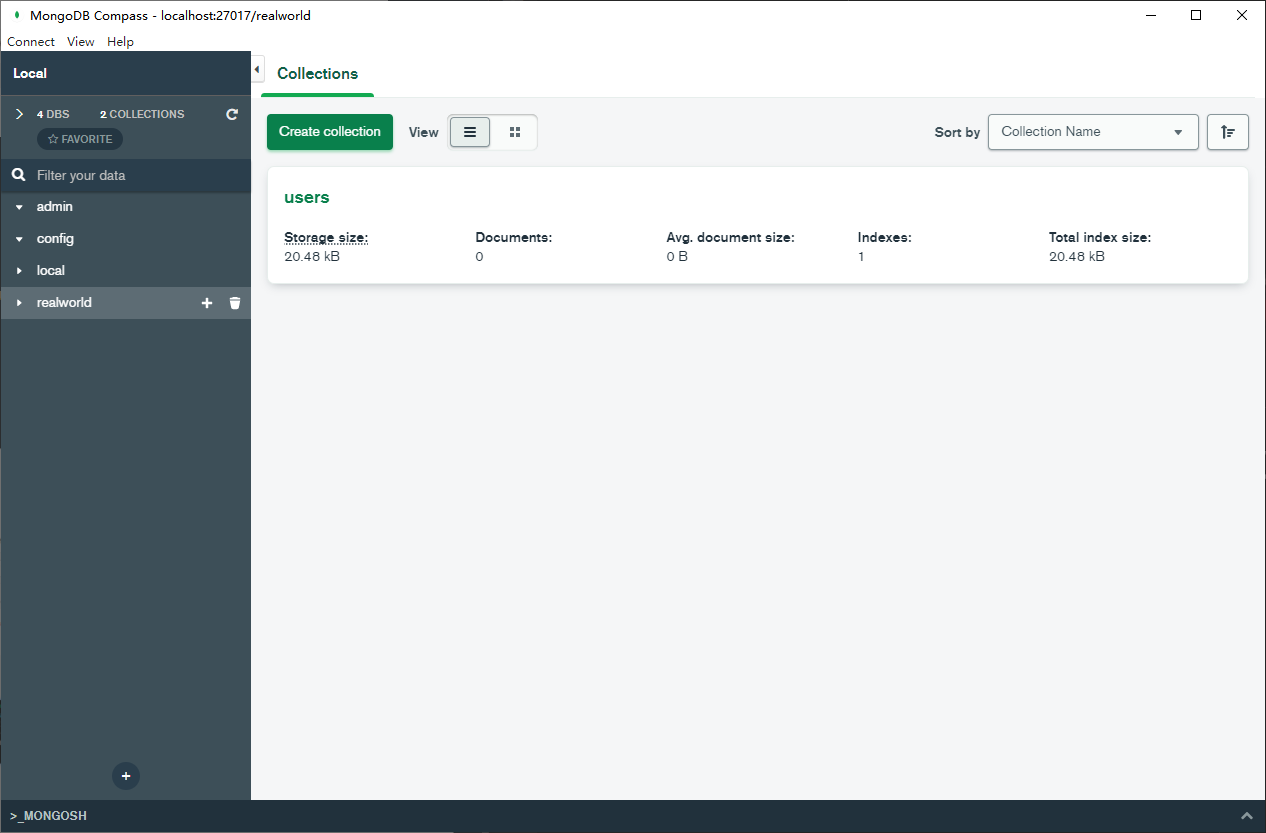
8.2 连接 Mongodb 数据库
首先,需要安装 Mongoose, npm install mongoose
Mongoose 5.0 中文文档
model \ index.js
1
2
3
4
5
6
7
8
9
10
11
12
13
14
15
16
17
18
| const mongoose = require("mongoose");
const { dbURL } = require("../config/config.default");
mongoose.connect(dbURL);
var db = mongoose.connection;
db.on("error", (err) => {
console.log("MongoDB 数据库连接失败", err);
});
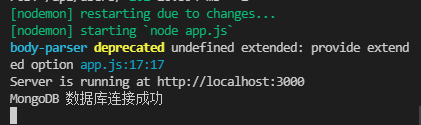
db.once("open", function () {
console.log("MongoDB 数据库连接成功");
});
|
数据库地址在配置中(便于上线等操作时直接更换地址)
config \ config.default.js
1
2
3
| module.exports = {
dbURL: "mongodb://localhost:27017/realworld",
};
|
运行( nodemon app.js)
8.3 增加数据模块(以 user 为例)
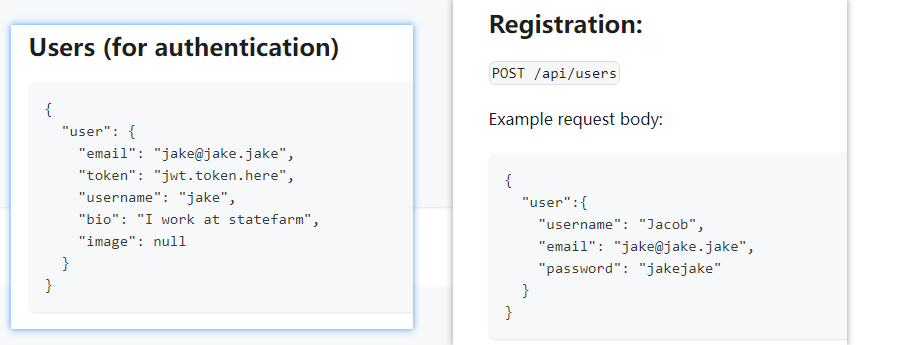
根据接口文档,确定属性
接口文档
model \ base-model.js(存放共有的属性,如创建时间,更新时间等)
1
2
3
4
5
6
7
8
9
10
| module.exports = {
createdAt: {
type: Date,
default: Date.now,
},
updatedAt: {
type: Date,
default: Date.now,
},
};
|
model \ user.js
1
2
3
4
5
6
7
8
9
10
11
12
13
14
15
16
17
18
19
20
21
22
23
24
25
26
27
28
29
30
31
32
| const mongoose = require("mongoose");
const baseModel = require("./base-model");
const userSchema = mongoose.Schema({
...baseModel,
username: {
type: String,
required: true,
},
email: {
type: String,
required: true,
},
password: {
type: String,
required: true,
},
bio: {
type: String,
default: null,
},
image: {
type: String,
default: null,
},
});
module.exports = userSchema;
|
module \ index.js
1
2
3
4
5
6
7
8
9
10
11
12
13
14
15
16
17
18
19
20
21
22
23
24
| const mongoose = require("mongoose");
const { dbURL } = require("../config/config.default");
mongoose.connect(dbURL);
var db = mongoose.connection;
db.on("error", (err) => {
console.log("MongoDB 数据库连接失败", err);
});
db.once("open", function () {
console.log("MongoDB 数据库连接成功");
});
module.exports = {
User: mongoose.model("User", require("./user")),
Article: mongoose.model("Article", require("./article")),
};
|
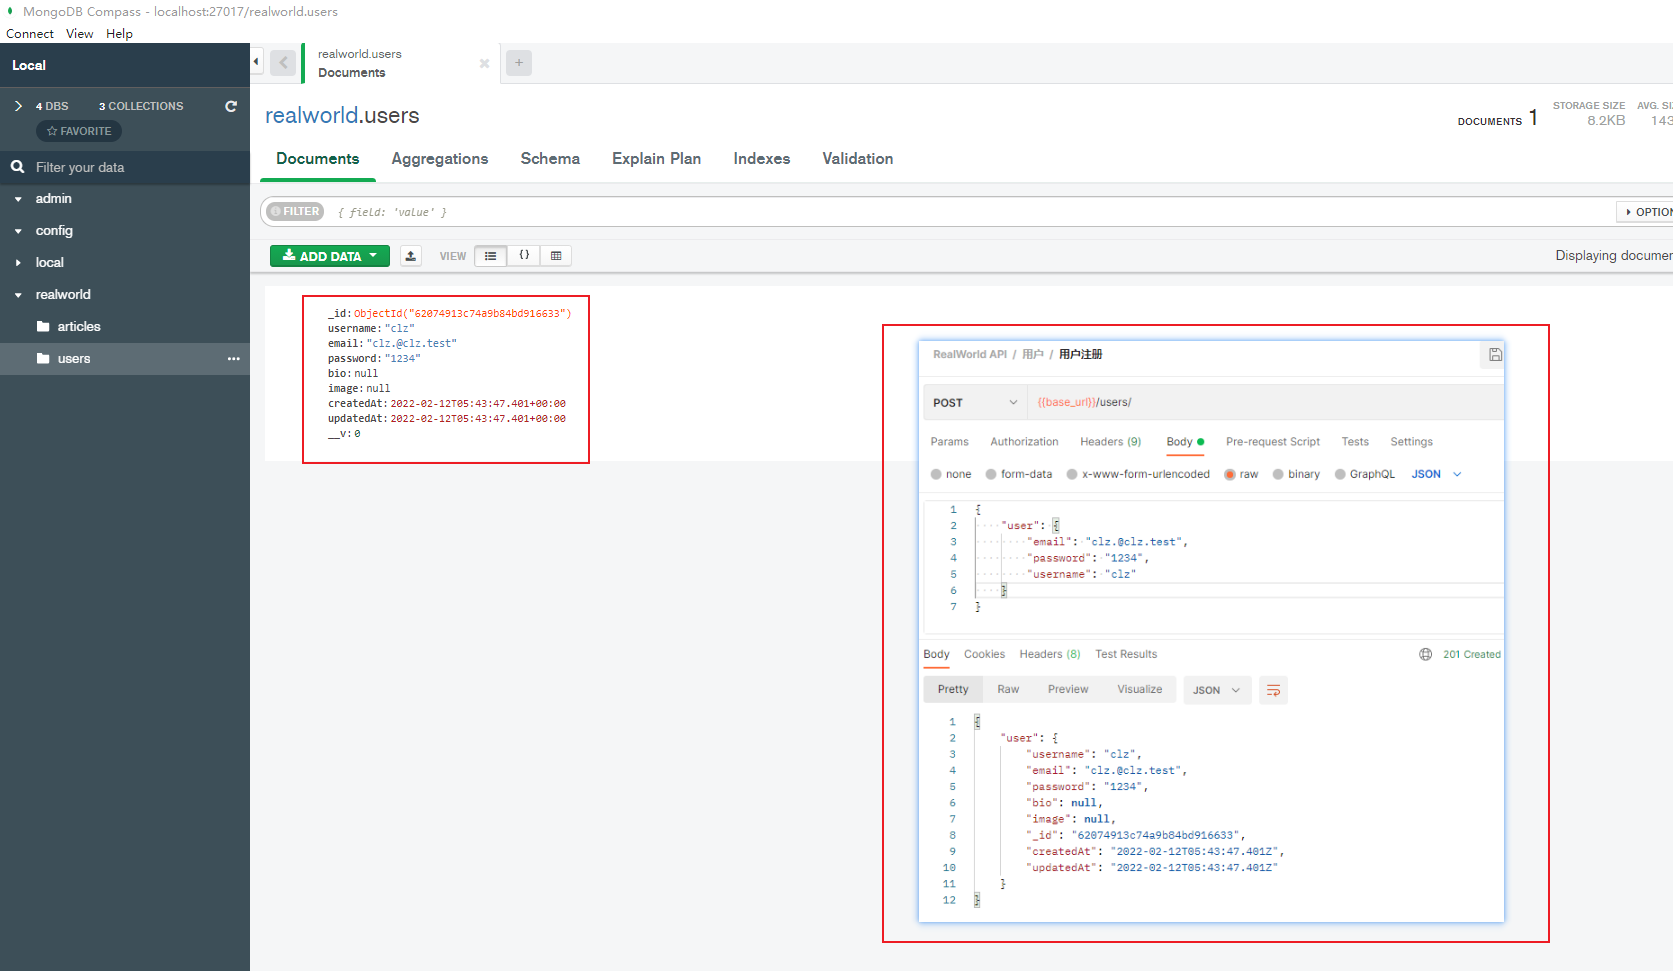
8.4 注册,操作数据库
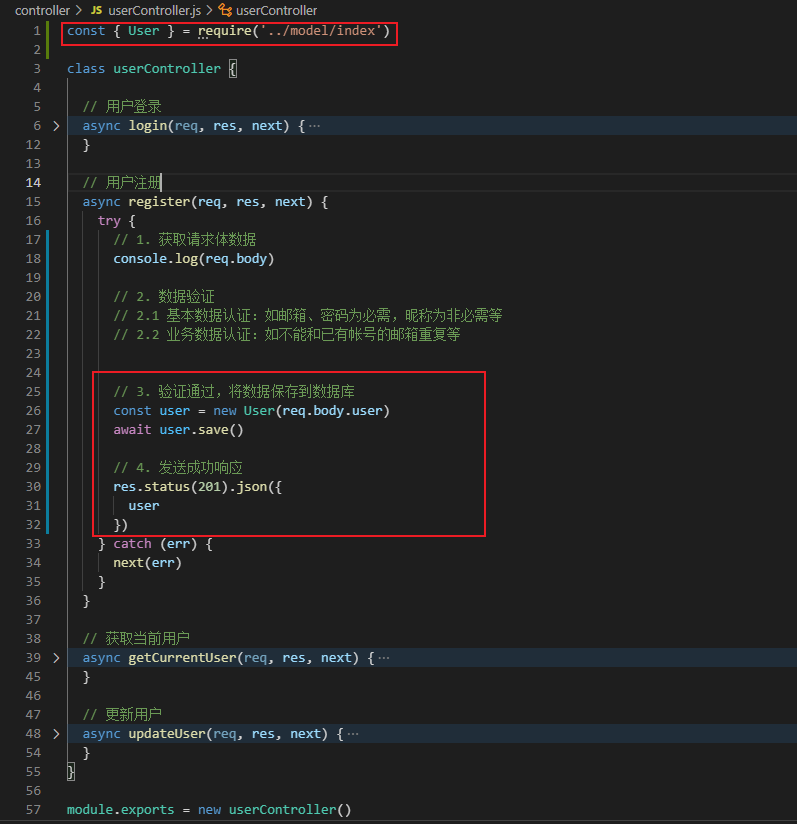
controller \ userController.js
9. 验证
首先,mongodb 添加模式时的 required: true可以实现一点验证是否缺必需参数。但是,还远远不够,以下提供两个验证的库。
9.1 基本使用
具体使用可查看文档
1
| npm install express-validator
|
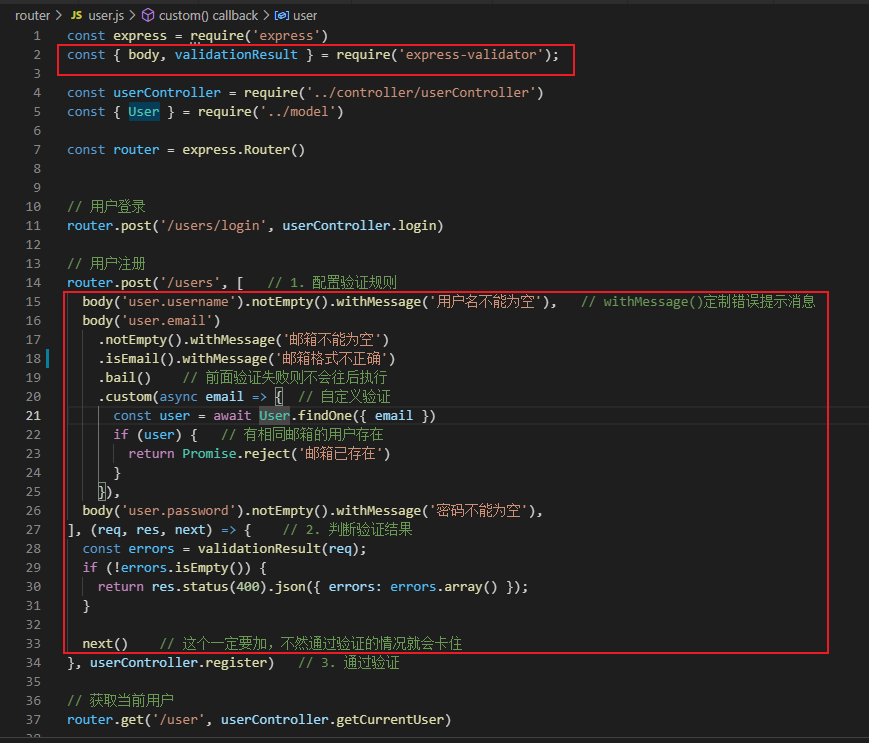
router \ user.js
1
2
3
4
5
6
7
8
9
10
11
12
13
14
15
16
17
18
19
20
21
22
23
24
25
26
27
28
29
30
31
32
33
|
router.post(
"/users",
[
body("user.username").notEmpty().withMessage("用户名不能为空"),
body("user.email")
.notEmpty()
.withMessage("邮箱不能为空")
.isEmail()
.withMessage("邮箱格式不正确")
.bail()
.custom(async (email) => {
const user = await User.findOne({ email });
if (user) {
return Promise.reject("邮箱已存在");
}
}),
body("user.password").notEmpty().withMessage("密码不能为空"),
],
(req, res, next) => {
const errors = validationResult(req);
if (!errors.isEmpty()) {
return res.status(400).json({ errors: errors.array() });
}
next();
},
userController.register
);
|

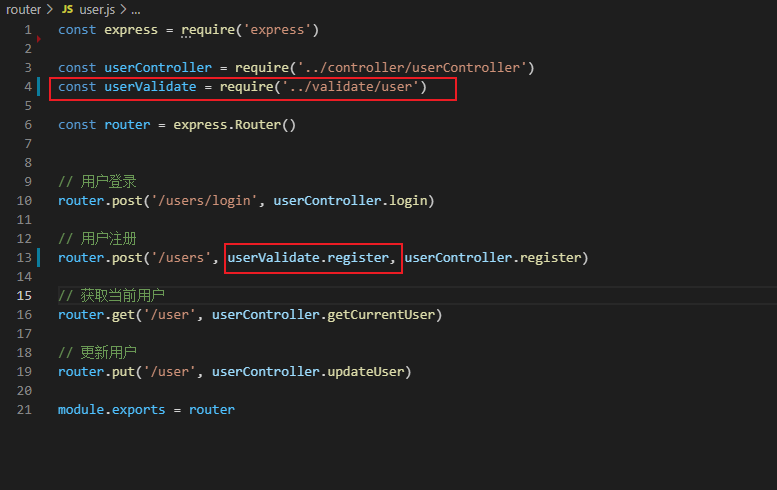
9.2 提取验证中间件模块
首先根据官方文档,增加验证中间件
middleware \ validate.js
1
2
3
4
5
6
7
8
9
10
11
12
13
14
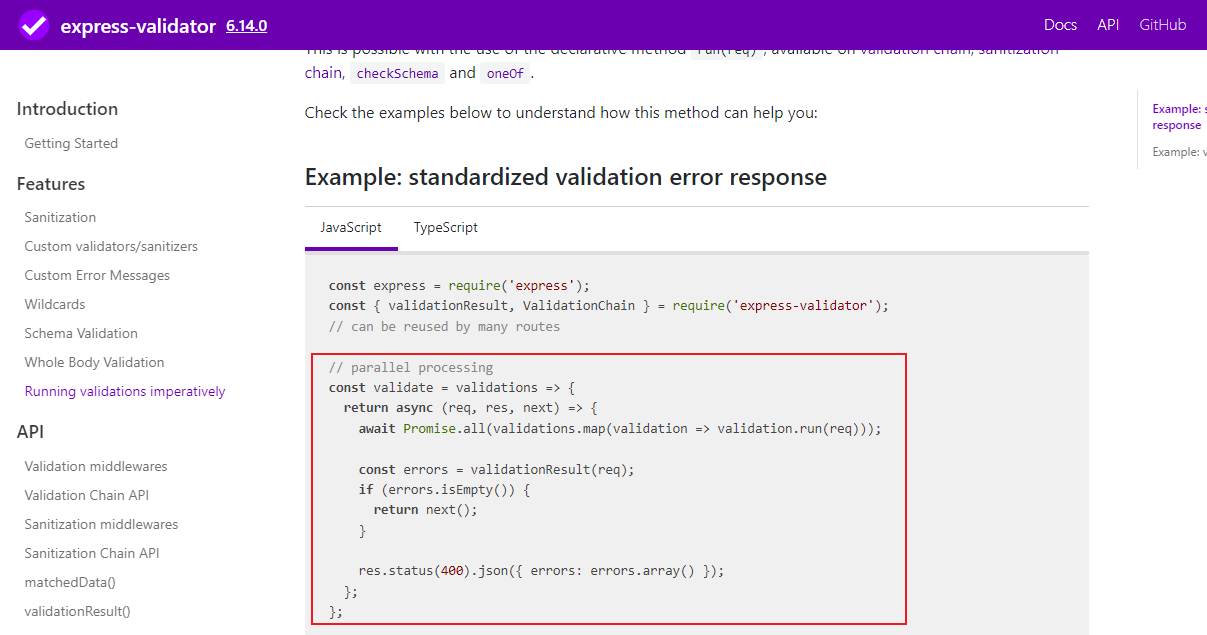
| const { validationResult } = require("express-validator");
module.exports = (validations) => {
return async (req, res, next) => {
await Promise.all(validations.map((validation) => validation.run(req)));
const errors = validationResult(req);
if (errors.isEmpty()) {
return next();
}
res.status(400).json({ errors: errors.array() });
};
};
|
新增文件夹 validate(验证业务逻辑代码)
validate \ user.js(用户的验证逻辑)
1
2
3
4
5
6
7
8
9
10
11
12
13
14
15
16
17
18
19
20
21
22
23
24
| const validate = require("../middleware/validate");
const { body, validationResult } = require("express-validator");
const { User } = require("../model");
exports.register = validate([
body("user.username").notEmpty().withMessage("用户名不能为空"),
body("user.email")
.notEmpty()
.withMessage("邮箱不能为空")
.isEmail()
.withMessage("邮箱格式不正确")
.bail()
.custom(async (email) => {
const user = await User.findOne({ email });
if (user) {
return Promise.reject("邮箱已存在");
}
}),
body("user.password").notEmpty().withMessage("密码不能为空"),
]);
|
修改 router \ user.js
10. 密码加密处理
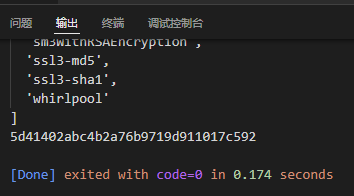
开始前,先了解一下,MD5 的使用
1
2
3
4
5
6
7
8
9
10
11
| const crypto = require("crypto");
console.log(crypto.getHashes());
const ret = crypto
.createHash("md5")
.update("456")
.digest("hex");
console.log(ret);
|
开搞。
封装 md5 模块
util \ md5.js
1
2
3
4
5
6
7
8
9
| const crypto = require("crypto");
module.exports = (str) => {
return crypto
.createHash("md5")
.update(str)
.digest("hex");
};
|
使用 md5 模块
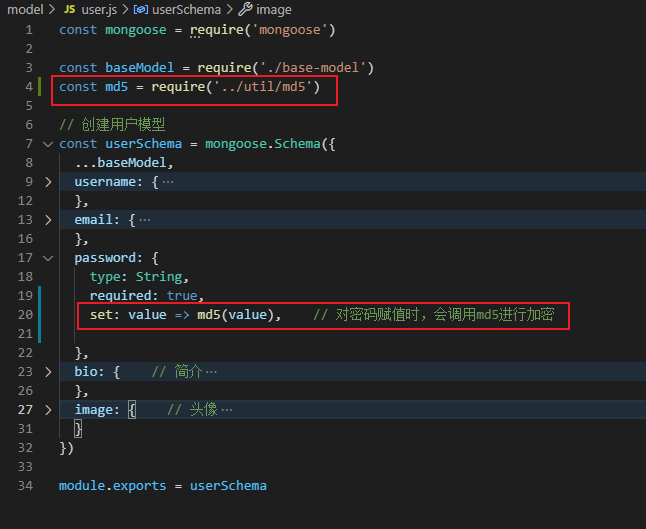
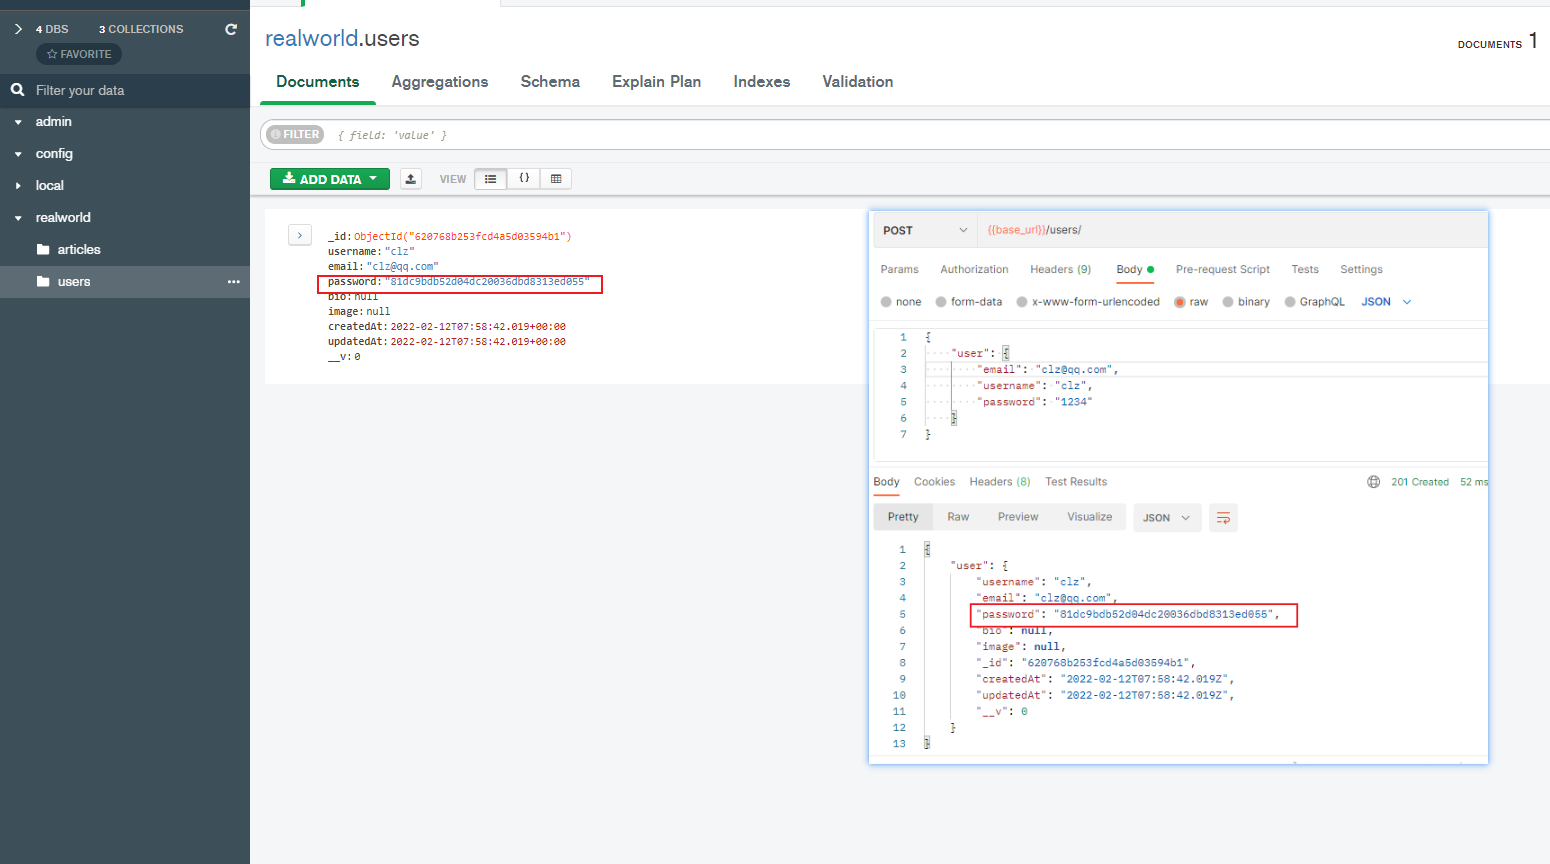
上面返回给用户的数据中,密码也给返回了,所以有点危险
用户模型修改:
1
2
3
4
5
6
7
| password: {
type: String,
required: true,
set: value => md5(value),
select: false
}
|
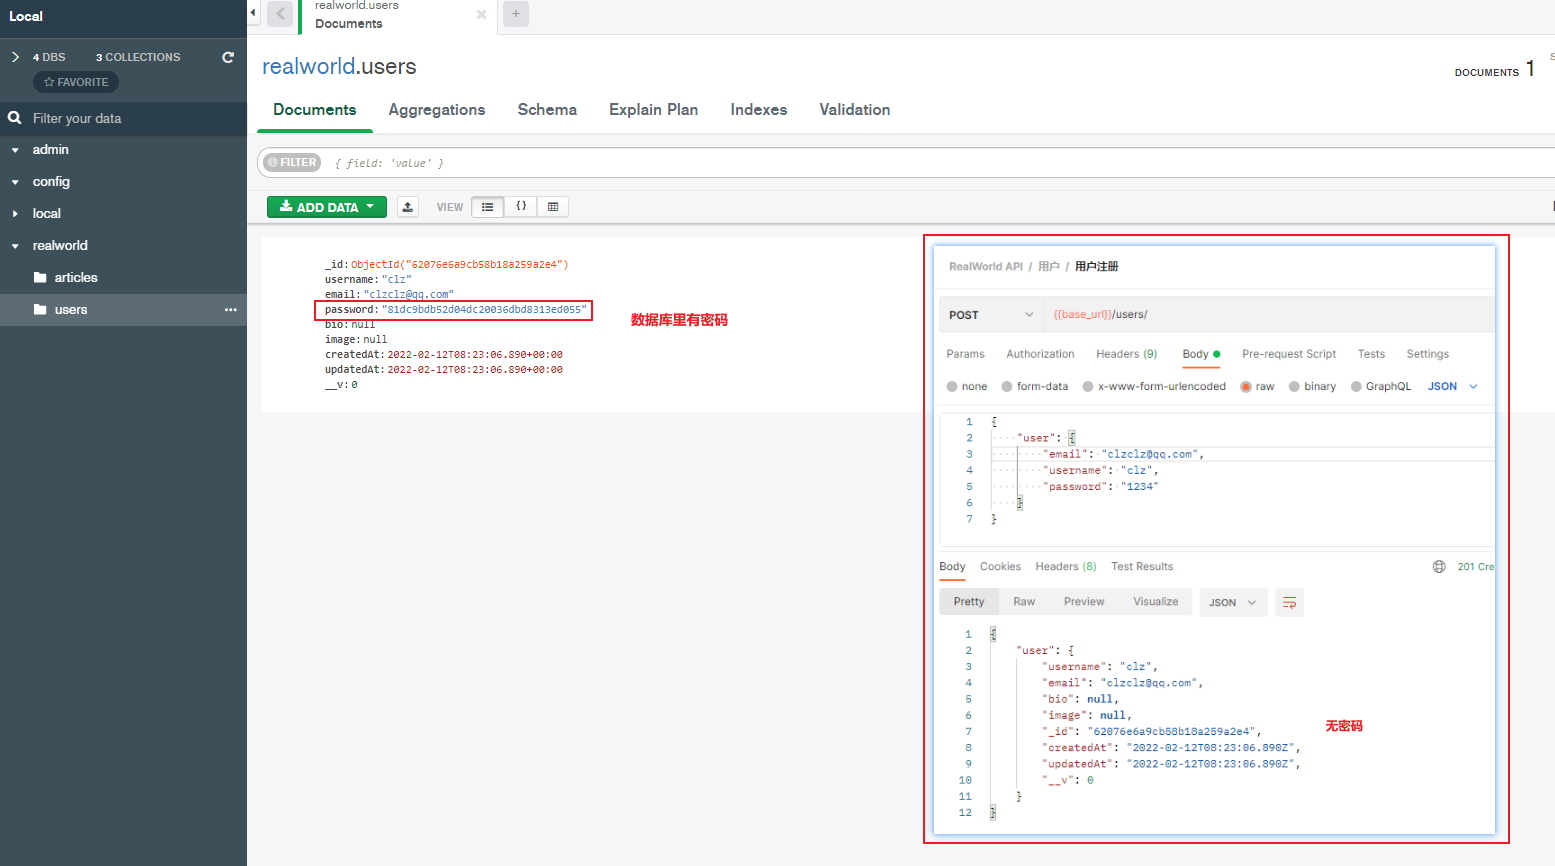
结果还是不对,因为注册的用户是新 new 出来的对象,而不是查询出来的
直接删除
1
2
3
4
5
6
7
8
9
10
11
12
13
14
15
16
17
|
async register(req, res, next) {
try {
let user = new User(req.body.user)
await user.save()
user = user.toJSON()
delete user.password
res.status(201).json({
user
})
} catch (err) {
next(err)
}
}
|
视频教程:Node.js 系列教程之 Express_哔哩哔哩_bilibili