Vue3 快速入门(二)
Vue3 快速入门(一)
1. 父子组件间的数据共享
1.1 props 父传子
子组件
1
2
3
4
5
6
7
8
9
10
11
12
13
14
15
16
17
18
| <template>
<h2>{{props.name}}</h2>
<h2>{{name}}</h2>
</template>
<script setup>
const props = defineProps({
name: {
type: String,
default: "",
},
});
</script>
|
父组件
1
2
3
4
5
6
7
| <template>
<Son name="clz"></Son>
</template>
<script setup>
import Son from "./components/Son.vue";
</script>
|
1.2 emit 子传父
子组件
1
2
3
4
5
6
7
8
9
10
11
12
13
14
| <template>
<h2>子组件数据:{{msg}}</h2>
<button @click="send">发送数据给父组件</button>
</template>
<script setup>
const msg = "我是子组件的数据";
const emit = defineEmits(["getMessage"]);
const send = () => {
emit("getMessage", msg);
};
</script>
|
父组件
1
2
3
4
5
6
7
8
9
10
11
12
13
14
| <template>
<h2>子组件数据:{{msg}}</h2>
<button @click="send">发送数据给父组件</button>
</template>
<script setup>
const msg = "我是子组件的数据";
const emit = defineEmits(["getMessage"]);
const send = () => {
emit("getMessage", msg);
};
</script>
|
1.3 v-model 实现父子互传
默认情况下,组件上的 v-model 使用 modelValue 作为 prop 和 update:modelValue 作为事件。可以通过向 v-model 传递参数来修改这些默认名称
子组件
1
2
3
4
5
6
7
8
9
10
11
12
13
14
15
16
17
18
19
20
21
22
| <template>
<h2>姓名:{{modelValue}}</h2>
<button @click="changeName">改名</button>
<h2>年龄:{{age}}</h2>
<button @click="changeAge">年龄</button>
</template>
<script setup>
defineProps({
modelValue: String,
age: Number,
});
const emit = defineEmits(["update:modelValue", "update:age"]);
const changeName = () => {
emit("update:modelValue", "赤蓝紫");
};
const changeAge = () => {
emit("update:age", 999);
};
</script>
|
父组件
1
2
3
4
5
6
7
8
9
10
11
12
13
14
| <template>
<Son v-model="person.name" v-model:age="person.age"></Son>
</template>
<script setup>
import { reactive } from "vue";
import Son from "./components/Son.vue";
const person = reactive({
name: "clz",
age: 21,
});
</script>
|
1.4 子组件 ref 变量子传父
子组件
1
2
3
4
5
6
7
8
9
10
11
12
13
14
15
16
17
18
19
20
21
| <template>
<h2>{{name}}</h2>
</template>
<script>
import { ref, toRefs } from "vue";
export default {
setup() {
const name = ref("clz");
const changeName = () => {
name.value = "赤蓝紫";
};
return {
name,
changeName,
};
},
};
</script>
|
父组件
1
2
3
4
5
6
7
8
9
10
11
12
13
14
15
16
17
18
19
| <template>
<Son ref="sonRef"></Son>
</template>
<script setup>
import { nextTick, ref } from "vue";
import Son from "./components/Son.vue";
const sonRef = ref("sonRef");
nextTick(() => {
console.log(sonRef.value.name);
setTimeout(() => {
sonRef.value.changeName();
}, 1000);
});
</script>
|
上面会发现用回了 setup 函数,这是因为需要引入一下 defineExpose
首先,变成 <script setup>,发现无法得到相同效果,甚至会报错
1
2
3
4
5
6
7
8
9
10
11
| <template>
<h2>{{name}}</h2>
</template>
<script setup>
import { ref, toRefs } from "vue";
const name = ref("clz");
const changeName = () => {
name.value = "赤蓝紫";
};
</script>
|
这是因为,标准组件写法中,子组件的数据都默认隐式暴露给父组件了,而在<script setup>模式下,所有数据只是默认 return 给 template 使用而已,不会暴露到组件外,所以父组件无法直接通过挂载 ref 变量获取子组件的数据。
可以通过 defineExpose将子组件显示暴露出来,父组件才能通过 ref 变量获取子组件的数据
1
2
3
4
5
6
7
8
9
10
11
12
13
14
15
16
| <template>
<h2>{{name}}</h2>
</template>
<script setup>
import { ref, toRefs } from "vue";
const name = ref("clz");
const changeName = () => {
name.value = "赤蓝紫";
};
defineExpose({
name,
changeName,
});
</script>
|
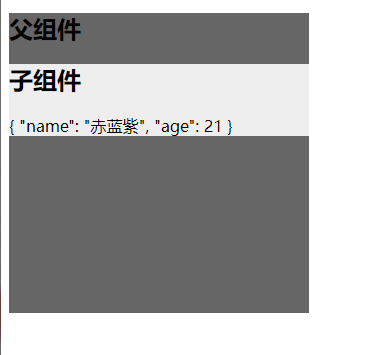
1.5 provide 和 inject
使用 provide和 inject,无论组件层次结构多深,父组件都可以作为其所有子组件的依赖提供者。
父组件通过 provide 来提供数据,子组件通过 inject 来使用这些数据
父组件
1
2
3
4
5
6
7
8
9
10
11
12
13
14
15
16
17
18
19
20
21
22
23
24
25
26
27
28
29
30
31
32
33
34
| <template>
<div class="father">
<h2>父组件</h2>
<Son></Son>
</div>
</template>
<script>
import { reactive, toRefs, provide } from "vue";
import Son from "./components/Son.vue";
export default {
name: "App",
components: {
Son,
},
setup() {
let person = reactive({ name: "赤蓝紫", age: 21 });
provide("person", person);
return { ...toRefs(person) };
},
};
</script>
<style scoped>
.father {
width: 300px;
height: 300px;
background-color: #666;
}
</style>
|
子组件
1
2
3
4
5
6
7
8
9
10
11
12
13
14
15
16
17
18
19
20
21
22
23
| <template>
<div class="son">
<h2>子组件</h2>
{{person}}
</div>
</template>
<script>
import { inject } from "vue";
export default {
setup() {
let person = inject("person");
return { person };
},
};
</script>
<style scoped>
.son {
background-color: #eee;
}
</style>
|
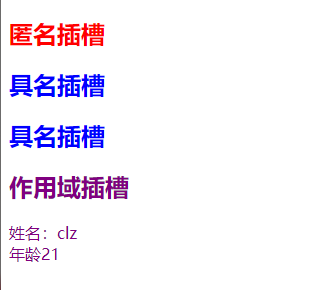
2. 插槽 slot
子组件
1
2
3
4
5
6
7
8
9
10
11
12
13
14
15
16
17
18
19
| <template>
<slot />
<slot name="title" />
<slot name="footer" :scope="person" />
</template>
<script setup>
import { reactive } from "vue";
const person = reactive({
name: "clz",
age: 21,
});
</script>
|
父组件
1
2
3
4
5
6
7
8
9
10
11
12
13
14
15
16
17
18
19
20
21
22
23
24
25
26
27
28
29
30
31
32
33
34
| <template>
<Son>
<h2 class="default">匿名插槽</h2>
<template #title>
<h2 class="name">具名插槽</h2>
<h2 class="name">具名插槽</h2>
</template>
<template #footer="{ scope }">
<h2 class="area">作用域插槽</h2>
<footer class="area">姓名:{{scope.name}}</footer>
<footer class="area">年龄{{scope.age}}</footer>
</template>
</Son>
</template>
<script setup>
import Son from "./components/Son.vue";
</script>
<style scoped>
.default {
color: red;
}
.name {
color: blue;
}
.area {
color: purple;
}
</style>
|
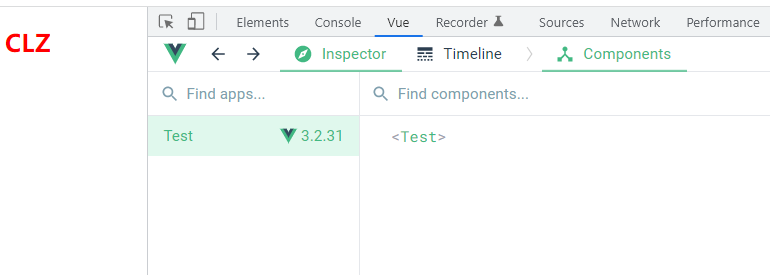
3. CSS 变量注入
1
2
3
4
5
6
7
8
9
10
11
12
13
14
15
| <template>
<h2>CLZ</h2>
</template>
<script setup>
import { ref } from "vue";
const color = ref("red");
</script>
<style scoped>
h2 {
color: v-bind("color");
}
</style>
|
4. 定义组件的 name
用单独的 <script>块定义即可
1
2
3
4
5
6
7
8
9
10
11
12
13
14
15
16
17
18
19
20
21
| <template>
<h2>CLZ</h2>
</template>
<script setup>
import { ref } from "vue";
const color = ref("red");
</script>
<script>
export default {
name: "Test",
};
</script>
<style scoped>
h2 {
color: v-bind("color");
}
</style>
|
5. Vuex 的简单使用
之前在字节的青训营里,有老师建议不要再学 Vuex 了,要就学 pinia。然后实习要先搞一手老项目,用的就是 Vuex,自然还是得学一下的。当然,之后再学一下 pinia,看能不能自己悟出来,为什么老师更建议 pinia
5.1 介绍
Vuex 是一个专为 Vue.js 应用程序开发的状态管理模式 + 库。它采用集中式存储管理应用的所有组件的状态,并以相应的规则保证状态以一种可预测的方式发生变化。
状态管理模式:
- 状态:驱动应用的数据源
- 视图:以声明方式将状态映射到视图
- 操作:响应在视图上的用户输入导致的状态变化
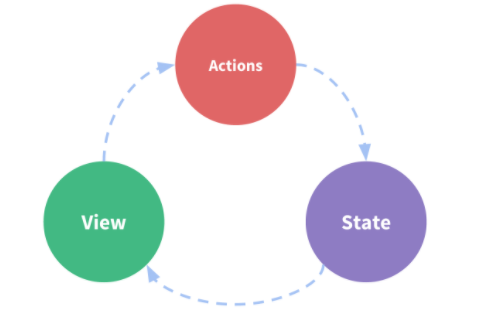
但是,当需要多个组件共享状态时,单向数据流的简洁性很容易被破坏。因为:
- 多个视图依赖于同一状态
- 来自不同视图的行为需要变更同一状态
Vuex 就是将组件的共享状态抽离出来,是代码变得更结构化且易维护
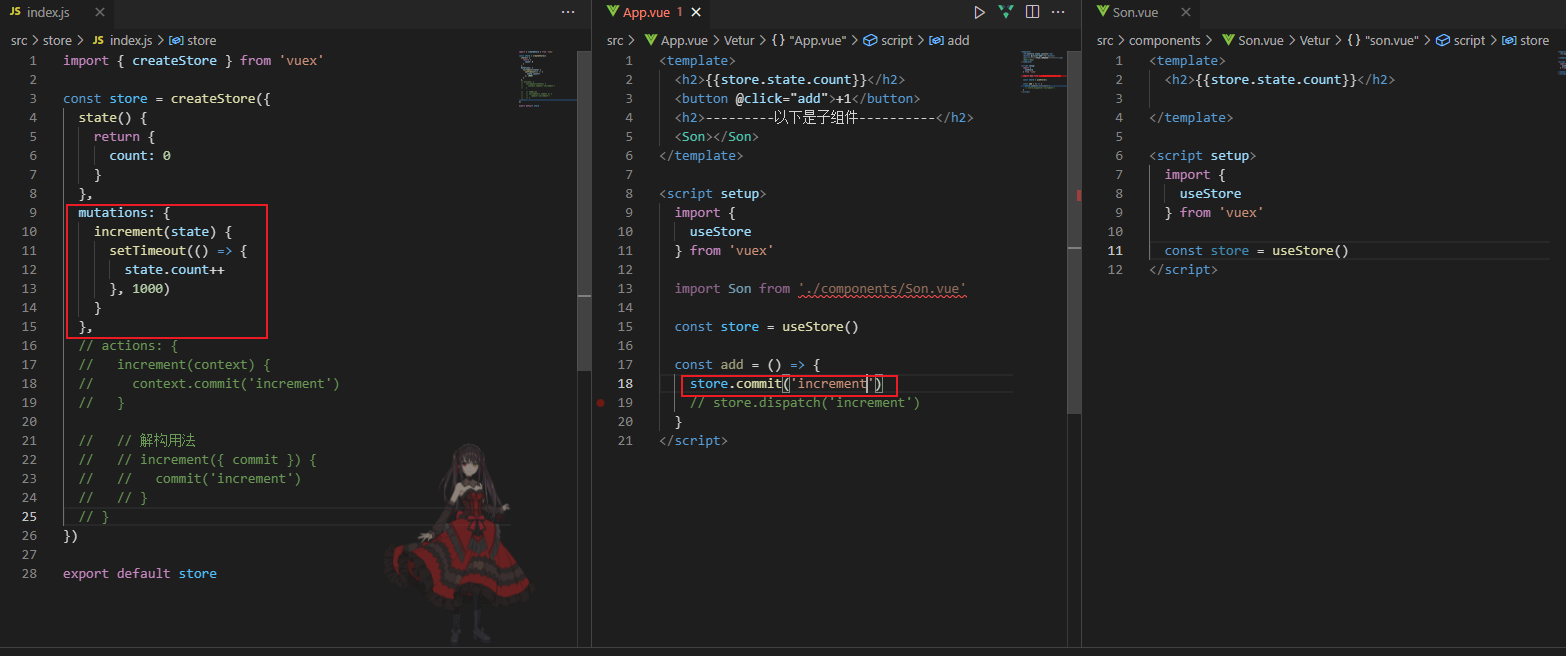
5.2 State 和 Mutation
State:存储共享状态
Mutation: 修改状态。更改 Vuex 的 store 中的状态的唯一方法是提交 mutation
store \ index.js
1
2
3
4
5
6
7
8
9
10
11
12
13
14
15
16
17
18
19
20
21
22
| import { createStore } from "vuex";
const store = createStore({
state() {
return {
count: 0,
};
},
mutations: {
increment(state) {
state.count++;
},
},
});
export default store;
|
main.js
1
2
3
4
5
| import { createApp } from "vue";
import App from "./App.vue";
import store from "./store";
createApp(App).use(store).mount("#app");
|
App.vue
1
2
3
4
5
6
7
8
9
10
11
12
13
14
15
16
17
18
19
20
21
22
23
24
| <template>
<h2>{{store.state.count}}</h2>
<button @click="add">+1</button>
<h2>---------以下是子组件----------</h2>
<Son></Son>
</template>
<script setup>
import { useStore } from "vuex";
import Son from "./components/Son.vue";
const store = useStore();
const add = () => {
store.commit("increment");
};
</script>
|
components \ Son.vue
1
2
3
4
5
6
7
8
9
| <template>
<h2>{{store.state.count}}</h2>
</template>
<script setup>
import { useStore } from "vuex";
const store = useStore();
</script>
|
又有问题了,不通过store.commit()来修改,而是通过 store.state.***来修改,会发现展示的效果不一样,但是呢,实际上存储的状态那边是没有更新的,所以状态的修改必须通过mutations下的方法修改。下面就来瞧一瞧是不是真的。
add 方法变化:
1
2
3
| const add = () => {
store.state.count++;
};
|

可以发现,状态确实没有发生变化,只是视图发生了变化
5.3 Getter
Getter:访问 State 存储的状态
5.3.1 通过属性访问
Getter 会暴露为 store.getters 对象,可以以属性的形式访问这些值:
store \ index.js
1
2
3
4
5
6
7
8
9
10
11
12
13
14
15
16
17
18
19
20
21
| import { createStore } from "vuex";
const store = createStore({
state() {
return {
count: 0,
};
},
getters: {
count: (state) => {
return state.count;
},
},
mutations: {
increment(state) {
state.count++;
},
},
});
export default store;
|
main.js
1
2
3
4
5
| import { createApp } from "vue";
import App from "./App.vue";
import store from "./store";
createApp(App).use(store).mount("#app");
|
App.vue
1
2
3
4
5
6
7
8
9
10
11
12
13
14
15
16
17
18
19
20
| <template>
<h2>{{store.getters.count}}</h2>
<button @click="add">+1</button>
<h2>---------以下是子组件----------</h2>
<Son></Son>
</template>
<script setup>
import { useStore } from "vuex";
import Son from "./components/Son.vue";
const store = useStore();
const add = () => {
store.commit("increment");
};
</script>
|
components \ Son.vue
1
2
3
4
5
6
7
8
9
10
| <template>
<h2>{{store.getters.count}}</h2>
</template>
<script setup>
import { useStore } from "vuex";
const store = useStore();
</script>
|
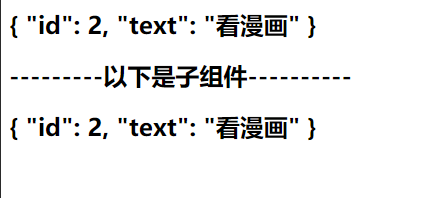
正常结果,Vue Devtools 下也实时更新
5.3.2 通过方法访问
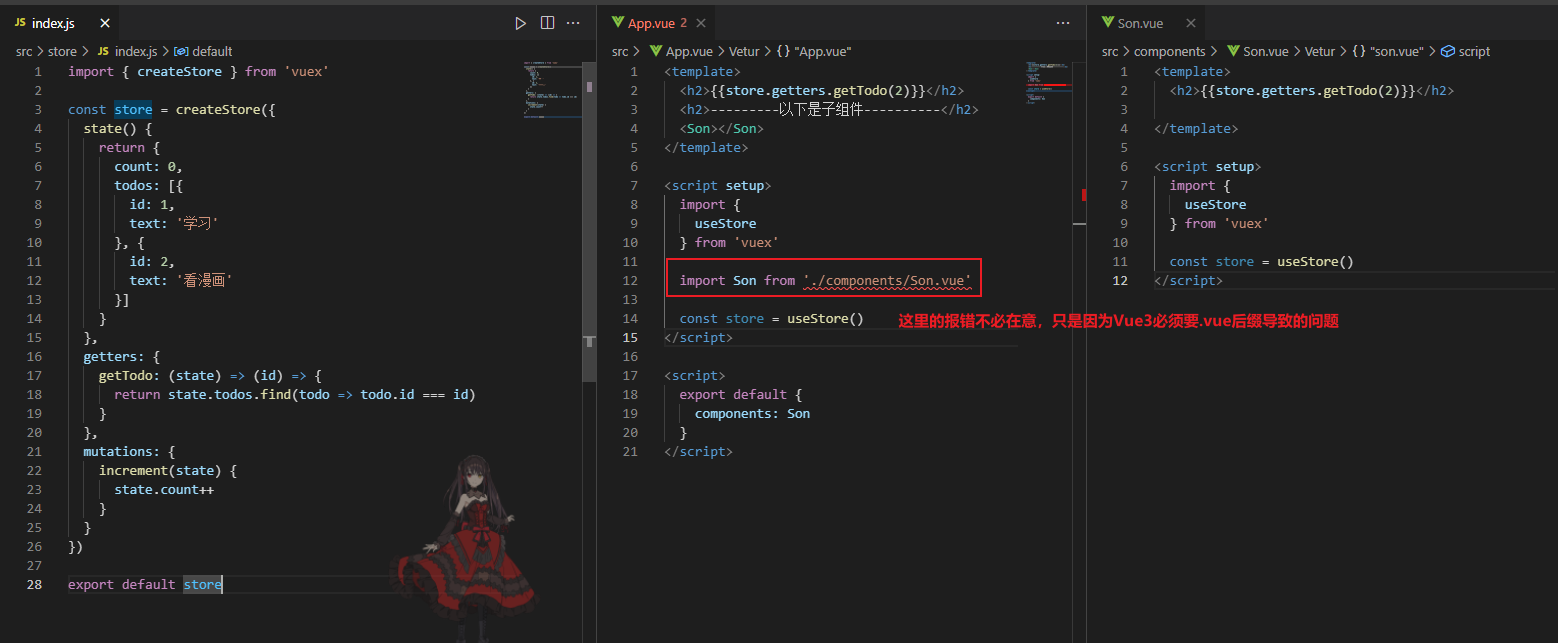
通过让 getter 返回一个函数,来实现给 getter 传参。
如:
1
2
3
4
5
| getters: {
getTodo: (state) => (id) => {
return state.todos.find(todo => todo.id === id)
}
},
|
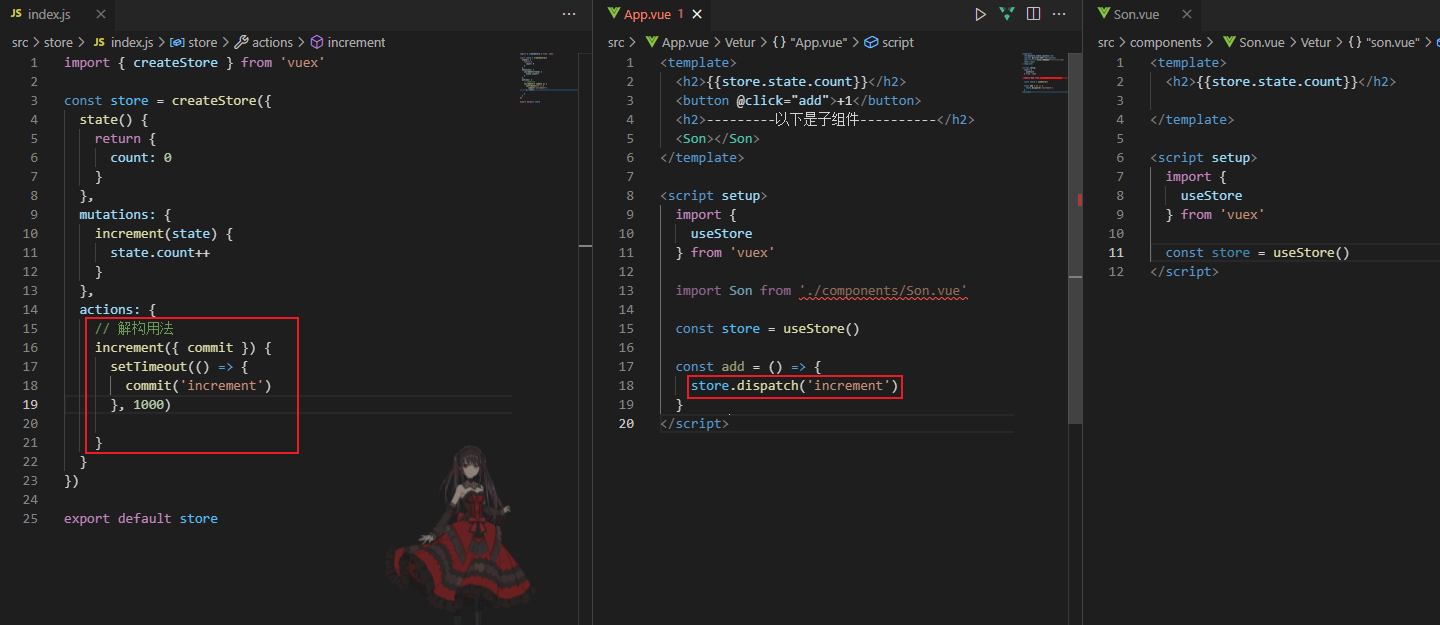
5.4 Action
Action:Action 类似于 mutation,不同在于:
- Action 提交的是 mutation,而不是直接变更状态。
- Action 可以包含任意异步操作。
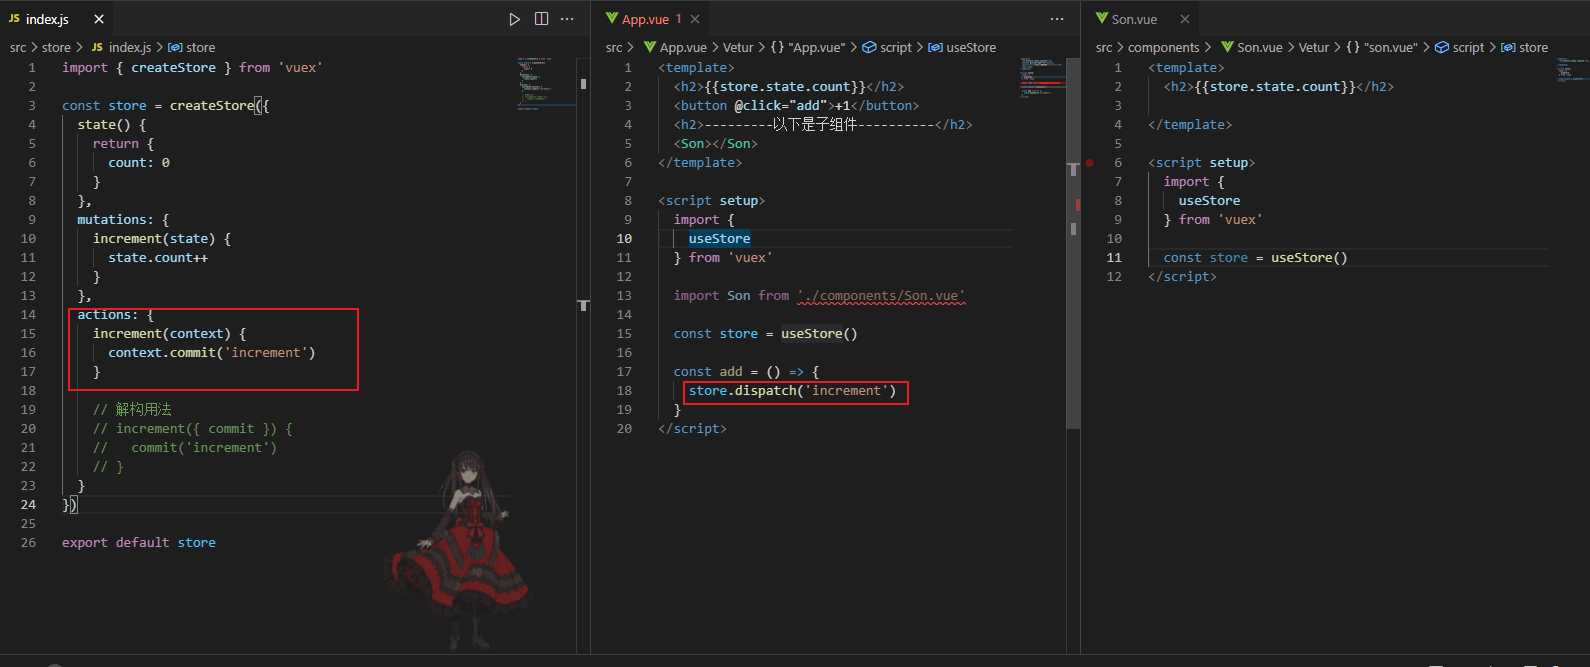
5.4.1 简单使用
Action 函数接受一个与 store 实例具有相同方法和属性的 context 对象,因此你可以调用 context.commit 提交一个 mutation,或者通过 context.state 和 context.getters 来获取 state 和 getters。
Action 通过 store.dispatch方法触发
1
| store.dispatch("increment");
|
5.4.2 Action 支持异步
为什么要通过 Action 提交 mutation呢?都直接提交不行吗?
这是因为mutation 必须同步执行,而 Action 不受约束
mutation 异步:在 mutation 中使用异步更新状态,虽然也会使状态正常更新,但是会导致开发者工具有时无法追踪到状态的变化,调试起来就会很困难

视图更新,存储的状态没有实时更新
action 异步:
5.5 Module
Module:Vuex 允许将 store 分割成**模块(module)**。每个模块拥有自己的 state、 mutation、 getter、 action,以及嵌套子模块
1
2
3
4
5
6
7
8
9
10
11
12
13
14
15
16
17
18
19
20
21
22
23
24
25
26
27
28
29
30
31
32
33
34
35
36
37
| const moduleA = {
state: () => ({
count: 0
}),
mutations: {
increment(state) {
state.count++
}
},
getters: { ... },
actions: {
add({ state, commit, rootState }) {
console.log(state.count)
console.log(rootState.count)
commit('increment')
}
}
}
const moduleB = {
state: () => ({ ... }),
mutations: { ... },
actions: { ... }
}
const store = createStore({
modules: {
a: moduleA,
b: moduleB
}
})
store.state.a
store.state.b
|
5.2.1 示例
store \ module \ user.js
1
2
3
4
5
6
7
8
9
10
11
12
13
14
15
16
17
18
19
20
21
22
23
24
25
26
| const user = {
state: () => ({
name: "clz",
age: 21,
}),
mutations: {
increment(state) {
state.age++;
},
},
getters: {
doubleAge(state) {
return state.age * 2;
},
},
actions: {
add({ state, commit, rootState }) {
console.log(state.name);
console.log(rootState.number);
commit("increment");
},
},
};
export default user;
|
store \ index.js
1
2
3
4
5
6
7
8
9
10
11
12
13
14
15
16
| import { createStore } from "vuex";
import user from "./module/user";
const store = createStore({
state() {
return {
number: 10,
};
},
modules: {
user: user,
},
});
export default store;
|
App.vue
1
2
3
4
5
6
7
8
9
10
11
12
13
14
15
16
| <template>
<h2>姓名: {{ user.name }}</h2>
<h2>年龄: {{ user.age }}</h2>
<button @click="add">年龄+1</button>
</template>
<script setup>
import { useStore } from "vuex";
const store = useStore();
const user = store.state.user;
const add = () => {
store.dispatch("add");
};
</script>
|
main.js
1
2
3
4
5
| import { createApp } from "vue";
import App from "./App.vue";
import store from "./store/index";
createApp(App).use(store).mount("#app");
|

学习参考链接:Vue3.2 setup 语法糖、Composition API 归纳总结
Vuex