uni-app 开发和常规 Vue 开发
uni-app 是一个使用 Vue.js 开发所有前端应用的框架,开发一次,可以发行为 App、小程序、网站,
常规 Web 开发只能发行为网站。
标签
生命周期
uni-app 中有三种类型的生命周期,应用生命周期、页面生命周期、组件生命周期
应用生命周期
应用生命周期只在 App.vue中有效
uni-app支持以下生命周期函数(部分)
| 函数名 |
说明 |
| onLaunch |
当 uni-app初始化完成时触发(全局只触发一次) |
| onShow |
当 uni-app启动时,或从后台进入前台时显示 |
| onHide |
当 uni-app从前台进入后台 |
| onError |
当 uni-app报错时触发 |
app.vue
1
2
3
4
5
6
7
8
9
10
11
12
13
14
15
16
17
| <script>
export default {
onLaunch: function () {
console.log("App Launch");
},
onShow: function () {
console.log("App Show");
},
onHide: function () {
console.log("App Hide");
},
};
</script>
<style>
/*每个页面公共css */
</style>
|
页面生命周期
页面生命周期
组件生命周期
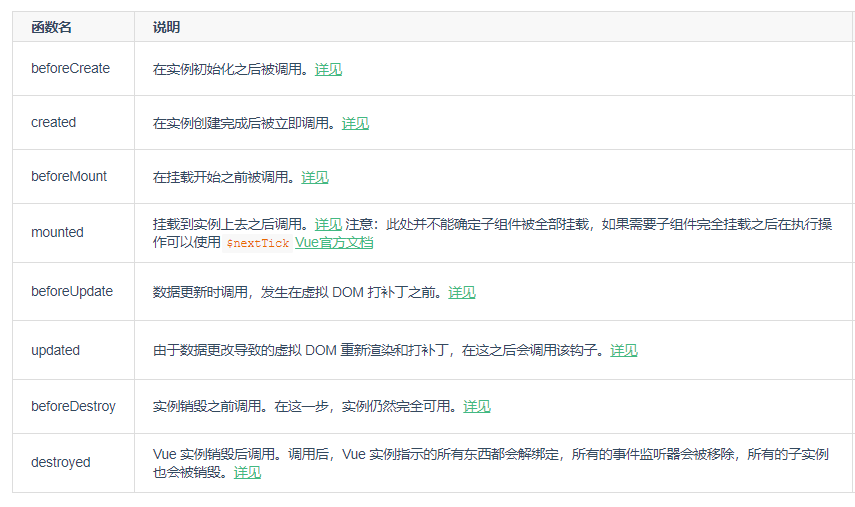
Vue 组件生命周期
uni-app 组件支持的生命周期,与 vue 标准组件的生命周期相同
路由
uni-app
uni-app页面路由为框架统一管理,开发者需要在pages.json里配置每个路由页面的路径及页面样式。
新建页面时,会在 pages.json中自动生成路由
pages.json
1
2
3
4
5
6
7
8
9
10
11
12
13
14
15
16
17
| "pages": [
{
"path": "pages/index/index",
"style": {
"navigationBarTitleText": "uni-app"
}
}
,{
"path" : "pages/login/login",
"style" :
{
"navigationBarTitleText": "",
"enablePullDownRefresh": false
}
}
]
|
uni-app 有两种页面路由跳转方式:使用navigator组件跳转、调用API跳转。
使用navigator组件跳转
1
| <navigator url="/" class="link">首页</navigator>
|
调用API跳转
1
2
3
| uni.navigateTo({
url: "/pages/login/login",
});
|
pages \ index.vue
1
2
3
4
5
6
7
8
9
10
11
12
13
14
15
16
17
18
19
20
21
22
23
24
25
26
27
28
29
| <template>
<view class="index">
<text class="text">首页</text>
<button class="btn" @click="login">登录</button>
</view>
</template>
<script>
export default {
methods: {
login() {
uni.navigateTo({
  url: "/pages/login/login",
});
},
},
};
</script>
<style lang="less" scoped>
.index {
text-align: center;
.btn {
width: 100px;
height: 50px;
}
}
</style>
|
pages \ login \ login.vue
1
2
3
4
5
6
7
8
9
10
11
12
13
14
15
16
17
18
19
20
21
22
23
24
| <template>
<view class="login">
login
<navigator url="/" class="link">首页</navigator>
</view>
</template>
<script>
export default {
data() {
return {};
},
methods: {},
};
</script>
<style>
.login {
text-align: center;
}
.link {
color: blue;
}
</style>
|
插一嘴:HBuilderX 感觉挺人性化的,缺少的插件保存时会自动帮你安装

Vue 路由
Vue 路由
相对 uni-app 的路由设置来说,Vue 的路由配置稍稍麻烦一点,先安装 vue-router,再建 router 文件夹,设置路由规则,并导出路由给 Vue 使用。详情点击上面的链接
Vue3 相对于 Vue2,也有所变化:Vue3 路由
路由守卫
通过安装 uni-simple-router插件,实现路由守卫功能
安装: npm install uni-simple-router
文档:uni-simple-router
使用:快速上手
页面之间传值
通过查询参数
首页
1
2
3
4
5
6
7
8
9
10
11
12
13
14
15
16
17
18
19
20
21
22
23
24
25
26
27
28
29
| <template>
<view class="index">
首页
<navigator :url="'/pages/login/login?msg=' + msg" class="login"
>登录</navigator
>
</view>
</template>
<script>
export default {
data() {
return {
msg: "Hello, login Pages",
};
},
};
</script>
<style lang="less" scoped>
.index {
width: 500px;
text-align: center;
margin: 20px auto;
}
.login {
color: blue;
}
</style>
|
登录页
1
2
3
4
5
6
7
8
9
10
11
12
13
14
15
16
17
18
19
20
21
22
23
24
25
26
27
28
29
| <template>
<view class="login">
<h2>登录</h2>
首页发送的信息: {{ msg }}
</view>
</template>
<script>
export default {
data() {
return {
msg: "",
};
},
methods: {},
onLoad(options) {
// 其参数为上个页面传递的数据,参数类型为 Object(用于页面传参)
this.msg = options.msg;
},
};
</script>
<style scoped>
.login {
text-align: center;
width: 300px;
margin: 20px auto;
}
</style>
|

以下部分,uni-app 和常规 Vue 开发一样,属于是复习内容
父子组件传值
和 Vue 一样,顺便复习一下
Vue 组件间的数据共享
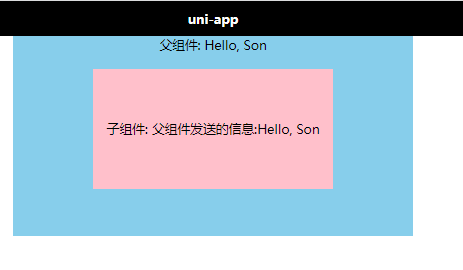
父传子(props)
子组件
1
2
3
4
5
6
7
8
9
10
11
12
13
14
15
16
17
18
19
20
21
22
23
24
25
| <template>
<view class="son"> 子组件: 父组件发送的信息:{{ msg }} </view>
</template>
<script>
export default {
name: "Son",
props: {
msg: {
type: String,
default: "",
},
},
};
</script>
<style scoped>
.son {
width: 300px;
height: 150px;
line-height: 150px;
background-color: pink;
margin: 20px auto;
}
</style>
|
父组件
1
2
3
4
5
6
7
8
9
10
11
12
13
14
15
16
17
18
19
20
21
22
23
24
25
26
27
28
29
30
| <template>
<view class="index">
<text class="text">父组件: {{ msg }}</text>
<Son :msg="msg"></Son>
</view>
</template>
<script>
import Son from "../../components/Son.vue";
export default {
components: {
Son,
},
data() {
return {
msg: "Hello, Son",
};
},
};
</script>
<style lang="less" scoped>
.index {
width: 500px;
height: 250px;
text-align: center;
background-color: skyblue;
margin: 0 auto;
}
</style>
|
子传父(emit)
子组件
1
2
3
4
5
6
7
8
9
10
11
12
13
14
15
16
17
18
19
20
21
22
23
24
25
26
27
28
29
30
31
32
| <template>
<view class="son">
子组件: {{ msg }}
<button @click="sendMsg">发送信息给父组件</button>
</view>
</template>
<script>
export default {
name: "Son",
data() {
return {
msg: "Hello Father",
};
},
methods: {
sendMsg() {
this.$emit("getMsg", this.msg);
},
},
};
</script>
<style scoped>
.son {
width: 300px;
height: 150px;
line-height: 150px;
background-color: pink;
margin: 20px auto;
}
</style>
|
父组件
1
2
3
4
5
6
7
8
9
10
11
12
13
14
15
16
17
18
19
20
21
22
23
24
25
26
27
28
29
30
31
32
33
34
35
| <template>
<view class="index">
<text class="text">父组件: 子组件发送的信息: {{ msg }}</text>
<Son @getMsg="getMsg"></Son>
</view>
</template>
<script>
import Son from "../../components/Son.vue";
export default {
components: {
Son,
},
data() {
return {
msg: "",
};
},
methods: {
getMsg(msg) {
this.msg = msg;
},
},
};
</script>
<style lang="less" scoped>
.index {
width: 500px;
height: 250px;
text-align: center;
background-color: skyblue;
margin: 0 auto;
}
</style>
|