Vue3 快速入门(一)
实习进入公司后,简单安装 vscode、node、git 等必备工具后,导师直接问有没有学过 vue3,说了只学过 vue2 后,就给我分享了两篇文章,以及让我查看文档,快速从 vue2 加速到 vue3。本文将参考到很多文章、文档,部分借用的可能没有备注出来,侵权请联系。(不过就算是参考,例子我很多按自己的理解弄成自己以后看更容易理解的了,虽然也差不了多少)
顺带附上以前的笔记:Vue2
1. 构建项目
开始的第一步,当然就是构建项目啦。这里就有一个重大的区别了,vue3 使用 web 开发构建工具vite,而不是 webpack
vite 优点:
- 无需打包,快速的冷服务器启动
- HMR(热更新)
- 按需编译
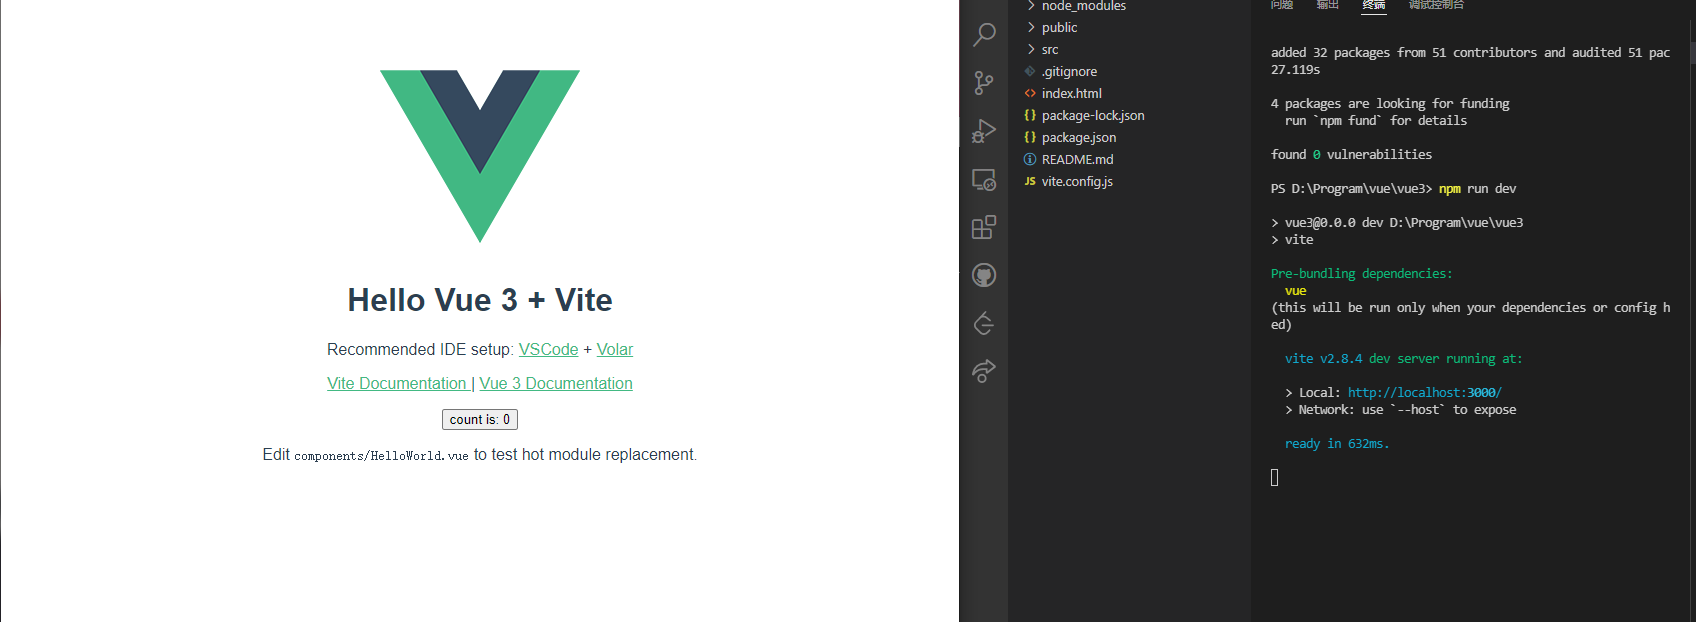
另外,vite 开启的服务器端口默认是 3000,而不是 8080
1
2
3
4
| npm init vite@latest
# 使用yarn
yarn create vite
|
按需选择
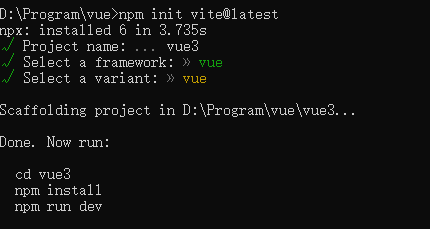
项目启动的方式不再是 npm run serve了,而是 npm run dev
2. 入口文件变化
Vue2
1
2
3
4
5
6
7
8
9
10
11
| import Vue from "vue";
import App from "./App.vue";
import router from "./router";
Vue.config.productionTip = false;
new Vue({
router,
render: (h) => h(App),
}).$mount("#app");
|
Vue3
1
2
3
4
5
| import { createApp } from "vue";
import App from "./App.vue";
import router from "./router";
createApp(App).use(router).mount("#app");
|
Vue3 引入的不再是 Vue 构造函数,而是 createApp工厂函数。
3. 组合式 API
3.1 set up
setup 函数是 Composition API(组合 API)的入口
在 setup 函数中定义的变量和方法需要 return 出去,才能在模板中使用
实际上和 vue2 类似,只不过在 vue2 中数据在 data 函数中,方法在 methods 节点中,而 vue3 则是”更有人情味了”,和原生 js 更相似,数据和方法就是普通的变量和方法,只需要 return 出去,就能在模板中使用。
Vue3
1
2
3
4
5
6
7
8
9
10
11
12
13
14
15
16
17
18
19
20
21
22
23
| <template>
<button @click="alertName">alert name</button>
<p>{{ nickname }}</p>
</template>
<script>
export default {
name: "App",
setup() {
let nickname = "赤蓝紫";
function alertName() {
alert(`我是${nickname}`);
}
return {
nickname,
alertName,
};
},
};
</script>
|
template 里不再必须要一个唯一的根标签了,这个改进个人感觉很舒服。查了一下资料,发现是虽然看似没有根节点,但是只是 vue3 的根节点是一个虚拟节点,不会映射到一个具体节点。因为一棵树必须有一个根节点,所以使用虚拟节点作为根节点非常有用。
Vue2
1
2
3
4
5
6
7
8
9
10
11
12
13
14
15
16
17
18
19
20
21
22
| <template>
<div id="app">
<button @click="alertName">alert nickname</button>
<p>{{ nickname }}</p>
</div>
</template>
<script>
export default {
name: "App",
data() {
return {
nickname: "赤蓝紫",
};
},
methods: {
alertName() {
alert(`我是${this.nickname}`);
},
},
};
</script>
|
3.2 ref
先看一下,下面这个例子
1
2
3
4
5
6
7
8
9
10
11
12
13
14
15
16
17
18
19
20
21
22
23
| <template>
<button @click="changeName">change name</button>
<p>{{ nickname }}</p>
</template>
<script>
export default {
name: "App",
setup() {
let nickname = "赤蓝紫";
function changeName() {
nickname = "clz";
console.log(nickname);
}
return {
nickname,
changeName,
};
},
};
</script>
|
点击后,发现数据改变了,但是 p 标签中的名字却没变,难道是 vue 的数据驱动视图失效了。
当然,并不是,只是 vue3 中多出了响应式数据和普通数据的区别,只有响应式数据才能驱动视图的改变。而上面的 nickname 只是字符串,不是响应式数据,试图自然也不会发生改变。
而将字符串变成响应式数据也非常简单,只需要引入并使用 ref即可
1
2
3
4
5
6
7
8
9
10
11
12
13
14
15
16
17
18
19
20
21
22
23
24
25
| <template>
<button @click="changeName">change name</button>
<p>{{ nickname }}</p>
</template>
<script>
import { ref } from "vue";
export default {
name: "App",
setup() {
let nickname = ref("赤蓝紫");
function changeName() {
nickname = "clz";
console.log(nickname);
}
return {
nickname,
changeName,
};
},
};
</script>
|
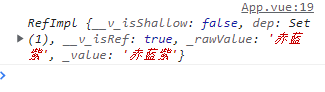
然而,还是不行,这是为什么呢?原因就是 ref 把 nickname 变成 RefImpl 的实例对象了,修改的时候要 .value去修改,底层还是用的 get 和 set 去操作。
把上面 changeName 方法中的 nickname = "clz"注释掉后,再点击按钮,就能知道变成 RefImpl 的实例对象了
最终版本:
1
2
3
4
5
6
7
8
9
10
11
12
13
14
15
16
17
18
19
20
21
22
23
24
25
| <template>
<button @click="changeName">change name</button>
<p>{{ nickname }}</p>
</template>
<script>
import { ref } from "vue";
export default {
name: "App",
setup() {
let nickname = ref("赤蓝紫");
function changeName() {
nickname.value = "clz";
}
return {
nickname,
changeName,
};
},
};
</script>
|
修改要用 .value来修改,为什么显示时不用 {{ nickname.value }}来显示呢?这是因为 vue3 检测到是 ref 对象后,直接给你 nickname.value 了(还挺人性化)
3.3 reactive
1
2
3
4
5
6
7
8
9
10
11
12
13
14
15
16
17
18
19
20
21
22
23
24
25
26
27
28
| <template>
<button @click="changeName">change name</button>
<p>name: {{ people.name }}</p>
<p>age: {{ people.age }}</p>
</template>
<script>
import { ref } from "vue";
export default {
name: "App",
setup() {
let people = ref({
name: "赤蓝紫",
age: 21,
});
function changeName() {
people.value.name = "clz";
}
return {
people,
changeName,
};
},
};
</script>
|
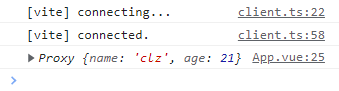
乍一看和上面的 ref 中一样,但是实际上如果是将对象类型转换成响应式数据是应该使用函数 reactive的,只是如果 ref 中是对象的话,会自动调用 reactive而已。打印 people.value可以发现不再是 RefImpl对象了,而是 Proxy对象。
- 基本数据类型:根据
Object.defineProperty里的 get和 set进行数据劫持来实现响应式
- 对象类型:通过
Proxy来实现响应式
1
2
3
4
5
6
7
8
9
10
11
12
13
14
15
16
17
18
19
20
21
22
23
24
25
26
27
28
29
30
31
32
33
| <template>
<button @click="changeName">change name</button>
<p>name: {{ people.name }}</p>
<p>age: {{ people.age }}</p>
<p>hobby: {{hobbys[0]}}, {{hobbys[1]}}</p>
</template>
<script>
import { reactive } from "vue";
export default {
name: "App",
setup() {
let people = reactive({
name: "赤蓝紫",
age: 21,
});
let hobbys = reactive(["音乐", "动漫"]);
function changeName() {
people.name = "clz";
hobbys[0] = "学习";
}
return {
people,
changeName,
hobbys,
};
},
};
</script>
|
上面有个问题:数组形式的不通过 reactive()转换成响应式也是响应式数据,暂不知道原因
也可以按 vue2 中 data 的形式来写
1
2
3
4
5
6
7
8
9
10
11
12
13
14
15
16
17
18
19
20
21
22
23
24
25
26
27
28
29
30
31
32
33
| <template>
<button @click="changeName">change name</button>
<p>name: {{ data.people.name }}</p>
<p>age: {{ data.people.age }}</p>
<p>hobby: {{data.hobbys[0]}}, {{data.hobbys[1]}}</p>
</template>
<script>
import { reactive } from "vue";
export default {
name: "App",
setup() {
let data = reactive({
people: {
name: "赤蓝紫",
age: 21,
},
hobbys: ["音乐", "动漫"],
});
function changeName() {
data.people.name = "clz";
data.hobbys[0] = "学习";
}
return {
data,
changeName,
};
},
};
</script>
|
ref 和 reactive 的区别:
| ref |
reactive |
| 定义基本类型数据 |
定义对象或数组类型数据 |
通过 Object.defineProperty()的 get和 set来实现响应式(数据劫持) |
通过 Proxy实现响应式(数据劫持),通过 Reflect操作源代码内部数据 |
操作数据需要 .value,读取不需要 |
操作个读取数据都不需要 .value |
3.3 computed
计算属性,和 vue2 差不多
1
2
3
4
5
6
7
8
9
10
11
12
13
14
15
16
17
18
19
20
21
22
23
24
25
26
27
28
29
| <template>
r: <input type="text" v-model.number="color.r" /><br />
g: <input type="text" v-model.number="color.g" /><br />
b: <input type="text" v-model.number="color.b" /><br />
rgb: <input type="text" v-model="color.rgb" :style="{color: color.rgb}" />
</template>
<script>
import { reactive, computed } from "vue";
export default {
name: "App",
setup() {
let color = reactive({
r: 255,
g: 0,
b: 0,
});
color.rgb = computed(() => {
return `rgb(${color.r}, ${color.g}, ${color.b})`;
});
return {
color,
};
},
};
</script>
|
如果修改计算出来的东西,会报警告,因为计算属性是只读属性

实现可修改:
1
2
3
4
5
6
7
8
9
10
11
12
13
14
15
16
17
18
19
20
21
22
23
24
25
26
27
28
29
30
31
32
33
34
35
36
37
38
| <template>
r: <input type="text" v-model="color.r" /><br />
g: <input type="text" v-model="color.g" /><br />
b: <input type="text" v-model="color.b" /><br />
rgb: <input type="text" v-model="color.rgb" :style="{color: color.rgb}" />
</template>
<script>
import { reactive, computed } from "vue";
export default {
name: "App",
setup() {
let color = reactive({
r: 255,
g: 0,
b: 0,
});
color.rgb = computed({
get() {
console.log(color.r);
return `rgb(${color.r},${color.g},${color.b})`;
},
set(value) {
let rgbList = value.split(",");
color.r = rgbList[0].slice(4);
color.g = rgbList[1];
color.b = rgbList[2].slice(0, -1);
},
});
return {
color,
};
},
};
</script>
|
实现计算属性可修改的关键:computed()参数为一个对象,对象中有一个 get 方法用来获取值,set 方法用来修改值
3.4 watch
监听器
1
2
3
4
5
6
7
8
9
10
11
12
13
14
15
16
17
18
19
20
21
22
23
24
25
26
27
28
29
30
31
| <template>
<div class="home">
<h1>当前数字为:{{num}}</h1>
<button @click="num++">+1</button>
</div>
</template>
<script>
import { ref, watch } from "vue";
export default {
name: "Home",
setup() {
let num = ref(0);
watch(
num,
(newValue, oldValue) => {
console.log(`数字增加了,现在的值${newValue}, 原值${oldValue}`);
}
);
return {
num,
};
},
};
</script>
|
1
2
3
4
5
6
7
8
9
10
11
12
13
14
15
16
17
18
19
20
21
22
23
24
25
26
27
28
29
30
31
32
33
34
35
36
37
38
39
40
41
42
43
44
45
46
47
48
49
50
| <template>
<div class="home">
<h1>age:{{people.age}}</h1>
<button @click="people.age++">年龄加1</button>
<h1>salary:{{people.job.salary}}</h1>
<button @click="people.job.salary+=100">薪水加100</button>
</div>
</template>
<script>
import { reactive, watch } from "vue";
export default {
name: "Home",
setup() {
let people = reactive({
name: "赤蓝紫",
age: 21,
job: {
salary: -10,
},
});
watch(
people,
(newValue, oldValue) => {
console.log(`信息改变了`, newValue, oldValue);
},
{
deep: false,
}
);
return {
people,
};
},
};
</script>
|
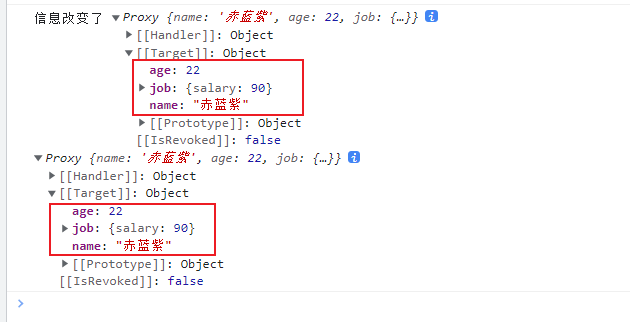
如果监听器用来监听 reactive 定义的响应式数据,那么无法获取到旧数据,而且默认开启深度监听,无法关闭深度监听
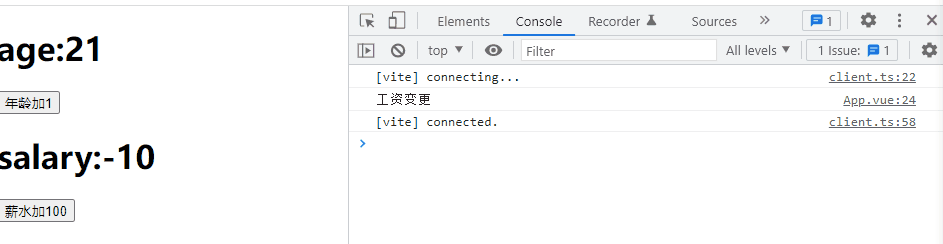
watchEffect:
- 默认开启了立即更新(
immediate: true)
- 用到谁就监听谁
1
2
3
4
5
6
7
8
9
10
11
12
13
14
15
16
17
18
19
20
21
22
23
24
25
26
27
28
29
30
31
32
| <template>
<div class="home">
<h1>age:{{people.age}}</h1>
<button @click="people.age++">年龄加1</button>
<h1>salary:{{people.job.salary}}</h1>
<button @click="people.job.salary+=100">薪水加100</button>
</div>
</template>
<script>
import { reactive, watchEffect } from "vue";
export default {
name: "Home",
setup() {
let people = reactive({
name: "赤蓝紫",
age: 21,
job: {
salary: -10,
},
});
watchEffect(() => {
const salary = people.job.salary;
console.log("工资变更");
});
return {
people,
};
},
};
</script>
|
3.5 生命周期钩子
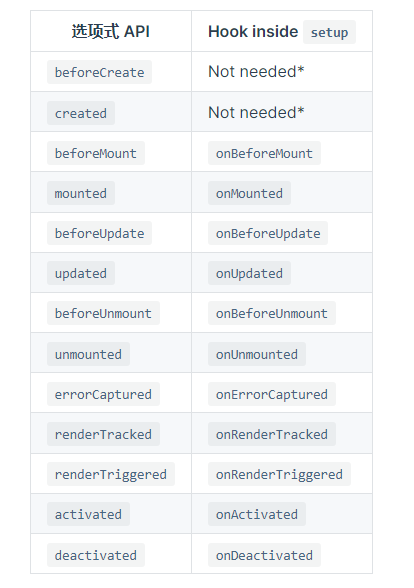
vue3 中,beforeDestroy改为beforeUnmount,destroyed改为unmounte
beforeCreate 和 created 没有 API,因为 setup 实际上就相当于这两个生命周期函数
使用示例:
1
2
3
4
5
6
7
8
9
10
11
12
13
14
15
16
17
18
19
20
21
22
23
24
25
26
27
| <template>
<h2>{{num}}</h2>
<button @click="num++">+1</button>
</template>
<script>
import { onMounted, onUpdated } from "vue";
import { ref } from "vue";
export default {
name: "Home",
setup() {
onMounted(() => {
console.log("onMounted");
}),
onUpdated(() => {
console.log("数据更新啦");
});
let num = ref(0);
return {
num,
};
},
};
</script>
|
3.6 toRef 和 toRefs
toRef 就是把数据变成 ref 类型的数据, toRefs就是将多个数转换成响应式数据
先引用一下之前的例子:
1
2
3
4
5
6
7
8
9
10
11
12
13
14
15
16
17
18
19
20
21
22
23
24
25
26
27
28
29
30
31
32
| <template>
<div class="home">
<h1>age:{{people.age}}</h1>
<button @click="people.age++">年龄加1</button>
<h1>salary:{{people.job.salary}}</h1>
<button @click="people.job.salary+=100">薪水加100</button>
</div>
</template>
<script>
import { reactive, watchEffect } from "vue";
export default {
name: "Home",
setup() {
let people = reactive({
name: "赤蓝紫",
age: 21,
job: {
salary: -10,
},
});
watchEffect(() => {
const salary = people.job.salary;
console.log("工资变更");
});
return {
people,
};
},
};
</script>
|
仔细观察,可以发现 template中,使用了很多次 people.,于是想偷一下懒,return 的时候耍点小聪明
1
2
3
4
| return {
age: people.age,
salary: people.job.salary,
};
|
哦豁,点击按钮不再能改变数据了,原因就是因为 return 出去的数据不是响应式,而是 number,自然不能改变。验证也很简单,只要在 watchEffect()中顺便打印出 people.age就行了。
通过 toRef就可以实现自动修改 people里的数据,不要忘记引入 toRef了
1
2
3
4
| return {
age: toRef(people, "age"),
salary: toRef(people.job, "salary"),
};
|
这种时候,有可能会想到使用 ref 就可以了,即以下形式
1
2
3
4
| return {
age: ref(people.age),
salary: ref(people.job.salary),
};
|
这样子,乍一看,效果确实一样,但是,实际上的数据并没有发现改变,通过监听器就可以发现
为什么呢?实际上使用 ref 的话,有类似于 new 出来一个对象,new 出来的对象自然和原来的数据没有什么实质上的联系
使用 toRefs就可以稍微偷一下懒
1
2
3
4
| return {
...toRefs(people),
...toRefs(people.job),
};
|
4. 其他改变
移除 keyCode作为 v-on的修饰符
1
2
3
4
| <input v-on:keyup.13="submit" />
<input v-on:keyup.enter="submit" />
|
移除 native作为 v-on的修饰符
移除 filter过滤器
Vue 3 迁移策略笔记
4.1 $refs
1
2
3
4
5
6
7
8
9
10
11
12
13
14
15
16
17
18
19
20
21
22
23
24
| <template>
<button @click="getValue" ref="btn">点击</button>
</template>
<script>
import { getCurrentInstance, nextTick, reactive, ref } from "vue";
export default {
setup() {
const ci = getCurrentInstance();
const { proxy } = getCurrentInstance();
function getValue() {
console.log(ci.refs.btn);
console.log(proxy.$refs.btn);
}
return {
getValue,
};
},
};
</script>
|
4.2 nextTick
nextTick():在下次 DOM 更新循环结束之后执行延迟回调。在修改数据之后立即使用这个方法,获取更新后的 DOM。
1
2
3
4
5
6
7
8
9
10
11
12
13
14
15
16
17
18
19
20
21
22
23
24
25
26
27
28
29
30
| <template>
<button @click="change" ref="btn">{{msg}}</button>
</template>
<script>
import { getCurrentInstance, nextTick, ref } from "vue";
export default {
setup() {
let { proxy } = getCurrentInstance();
let msg = ref("Hi");
function change() {
const btn = proxy.$refs.btn;
msg.value = "Hello";
console.log("直接打印:", btn.innerText);
nextTick(() => {
console.log("nextTick:", btn.innerText);
});
}
return {
msg,
change,
};
},
};
</script>
|
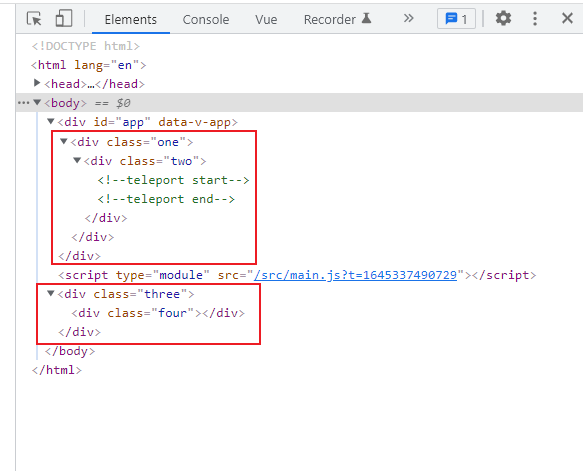
4.3 teleport
使用<teleport>,可以通过to将 teleport 下的 html 传送到指定位置(如传送到body中)。
1
2
3
4
5
6
7
8
9
10
11
12
13
14
15
16
17
| <template>
<div class="one">
<div class="two">
<teleport to="body">
<div class="three">
<div class="four"></div>
</div>
</teleport>
</div>
</div>
</template>
<script>
export default {
name: "App",
};
</script>
|
4.4 路由
app.vue
1
2
3
4
5
6
7
8
9
10
11
12
13
14
15
16
| <template>
<router-view></router-view>
</template>
<script>
import { useRoute, useRouter } from "vue-router";
export default {
setup() {
const route = useRoute();
const router = useRouter();
console.log(route.path);
router.push("/home");
},
};
</script>
|
main.js
1
2
3
4
5
| import { createApp } from "vue";
import App from "./App.vue";
import router from "./router";
createApp(App).use(router).mount("#app");
|
router \ index.js
1
2
3
4
5
6
7
8
9
10
11
12
13
14
15
16
17
18
19
| import { createRouter, createWebHashHistory } from "vue-router";
const routes = [
{
path: "/home",
name: "home",
component: () => import("../components/home.vue"),
},
{
path: "/login",
name: "login",
component: () => import("../components/login.vue"),
},
];
export default createRouter({
history: createWebHashHistory(),
routes,
});
|
注意:
在模板中仍然可以访问 $router 和 $route,所以不需要在 setup 中返回 router 或 route
从 vue-router中引入的useRoute,useRouter相当于 vue2 的 this.$route,this.$router
引入组件时,必须加上 .vue后缀
编程式导航传参
params 不能与 path 一起使用,而应该使用name
1
2
3
4
5
6
7
8
9
10
11
12
13
14
15
16
17
18
19
20
21
22
23
24
25
26
27
28
29
30
| <template>
<router-view></router-view>
</template>
<script>
import { useRoute, useRouter } from "vue-router";
export default {
setup() {
const route = useRoute();
const router = useRouter();
router.push({
name: "login",
params: {
id: 666,
},
});
},
};
</script>
|
4.5 导航守卫
4.5.1 局部导航守卫
home.vue
1
2
3
4
5
6
7
8
9
10
11
12
13
14
15
| <template> home </template>
<script>
import { onBeforeRouteLeave } from "vue-router";
export default {
setup() {
onBeforeRouteLeave((to, from) => {
console.log("去", to);
console.log("来自", from);
});
},
};
</script>
|
4.5.2 全局导航守卫
main.js
1
2
3
4
5
6
7
8
9
10
11
12
| import { createApp } from "vue";
import App from "./App.vue";
import router from "./router";
router.beforeEach((to, from) => {
console.log("去", to);
console.log("来自", from);
});
createApp(App).use(router).mount("#app");
|
5. 法宝(setup 语法糖)
Vue3.0 通过 setup()函数,需要把数据和方法 return 出去才能使用,但是 Vue3.2 中,只需要在 srcipt 标签上加上 setup属性,这样子就无需 return,template 就可以直接使用了
1
2
3
4
5
6
7
8
9
10
11
12
| <template>
<button @click="alertName">alert name</button>
<p>{{ nickname }}</p>
</template>
<script setup>
let nickname = "赤蓝紫";
function alertName() {
alert(`我是${nickname}`);
}
</script>
|
参考:
vue3 保姆级教程
官方文档