Node.js 笔记 1. 简介 Node.js 是一个开源和跨平台的 JavaScript 运行时环境。Node.js 在浏览器之外运行 V8 JavaScript 引擎(Google Chrome 的内核)
特点
事件驱动:当事件被触发时,执行传递的回调函数
非阻塞 I/O 模型:当执行 I/O 操作时,不会阻塞线程
单线程
拥有世界最大的开源库生态系统 ——npm
Node.js 中文网 (nodejs.cn)
学习 Node.js 可以深入理解服务器开发 、Web 请求和响应过程 、了解服务器端如何与客户端配合
2. REPL 介绍 REPL 全称:Read-Eval-Print-Loop(交互式解释器)
R:读取, E:执行, P:打印,L:循环
控制台输入 node 命令进入 REPL 环境,两次 Ctrl + C 退出 REPL 环境
执行 js 文件
3. 文件读写 文件读写 :需要用到 fs 模块, 加载 fs 模块,: const fs = require('fs');
写文件 :
fs.writeFile(file, data[, options], callback)
file: 文件路径
data: 写入的数据
options: 设置文件对应属性,如编码方式等, 选填
callback:文件写入完毕后的回调函数
1
2
3
4
5
6
7
8
const fs = require ("fs" );writeFile ("./file.txt" , "Hello World!" , "utf-8" , (err ) => {if (err) {console .log ("写文件出错,具体错误:" , err);else {console .log ("ok" );
读文件:
fs.readFile(path[, options], callback)
1
2
3
4
5
6
7
8
9
const fs = require ("fs" );readFile ("./file.txt" , "utf-8" , (err, data ) => {if (err) {console .log ("读文件错误" );else {console .log (data);
__dirname : 当前模块的目录名
__filename : 当前模块的文件名
path 模块 :用于文件路径的拼接
4. 编写 http 服务程序 1 2 3 4 5 6 7 8 9 10 11 12 13 14 15 16 17 const http = require ("http" );const server = http.createServer ();on ("request" , (req, res ) => {setHeader ("Content-Type" , "text/html;charset=utf-8" ); write ("Hello World! <h1>你好</h1>" ); end (); listen (8080 , () => {console .log ("请访问:http://localhost:8080" );
5. 根据不同请求做出不同响应 实现进入首页出来首页的结构,进入其他页面出来 404 页面。现在不支持加载 html 文件中的其他文件,如 css 文件、图片等
1 2 3 4 5 6 7 8 9 10 11 12 13 14 15 16 17 18 19 20 21 22 23 24 25 26 27 28 29 const http = require ("http" );const fs = require ("fs" );const path = require ("path" );const server = httpcreateServer ((req, res ) => {if (req.url === "/" || req.url === "/index" ) {readFile (path.join (__dirname, "htmls" , "index.html" ), (err, data ) => {if (err) {throw err;end (data);else {readFile (path.join (__dirname, "htmls" , "404.html" ), (err, data ) => {if (err) {throw err;end (data);listen ("8080" , (err ) => {if (err) {console .log (err);else {console .log ("ok" );
实现加载 css 文件等,就是在判断条件中增加判断 css 的条件,并且设置响应头中的 Content-Type 为 text/css 即可,图片等文件同理
1 2 3 4 5 6 7 8 9 10 11 12 13 14 15 16 17 18 19 20 21 22 23 24 25 26 27 28 29 30 31 32 33 34 35 36 37 38 39 40 41 42 43 44 45 46 const http = require ("http" );const fs = require ("fs" );const path = require ("path" );const server = httpcreateServer ((req, res ) => {if (req.url === "/register" ) {readFile (join (__dirname, "htmls" , "register.html" ),(err, data ) => {if (err) {throw err;else {end (data);else if (req.url === "/css/register.css" ) {readFile (join (__dirname, "htmls" , "css" , "register.css" ),(err, data ) => {if (err) {throw err;else {setHeader ("Content-Type" , "text/css" );end (data);else {readFile (path.join (__dirname, "htmls" , "404.html" ), (err, data ) => {if (err) {throw err;else {end (data);listen (8080 , (err ) => {if (err) {throw err;else {console .log ("ok" );
通过npm install mime,然后使用 mime 模块优化上面的代码(上面的代码很多可复用的部分没有分离出来)
通过npm 官网 可以查看 mime 的用法
下面用到的用法:mime.getType(filePath)根据文件路径可以得到 Content-Type。
1
2
3
4
5
6
7
8
9
10
11
12
13
14
15
16
17
18
19
20
21
22
23
24
25
26
27
const http = require ("http" );const path = require ("path" );const fs = require ("fs" );const mime = require ("mime" );const server = httpcreateServer ((req, res ) => {const filePath = path.join (__dirname, "public" , req.url );readFile (filePath, (err, data ) => {if (err) {end ("文件不存在 404" );else {setHeader ("Content-Type" ,getType (filePath) + ";charset=utf-8;" end (data);listen (8080 , (err ) => {if (err) {throw err;else {console .log ("ok" );
6. url 模块 第一个参数是 url,第二个参数为 true 时,可以把查询字符串的参数部分变为对象形式,如下图所示
第二个参数不是 true(默认为 false)时
7. underscore 模块 1 2 3 4 5 6 7 8 9 10 11 const _ = require ("underscore" );const html = "<h2><%= name %></h2>" ; const f = _.template (html);console .log (f ({name : "clz" ,
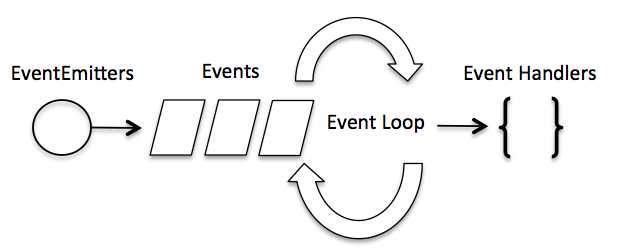
8. events 模块 事件驱动程序 :
Node.js 使用事件驱动模型,当 web server 接收到请求,就会把请求关闭,进行处理,然后去服务下一个 web 请求。当请求完成,它会被放回处理队列,当到达队列开头,结果会被返回给用户。
在事件驱动模型中,会生成一个主循环来监听事件,当检测到事件时会触发回调函数。
图片来源:菜鸟教程
1 2 3 4 5 6 7 8 9 10 11 12 13 14 15 16 17 18 const events = require ("events" );const eventEmitter = new events.EventEmitter (); const connectHandler = function connected (console .log ("连接成功" );emit ("data_received" );on ("connection" , connectHandler); on ("data_received" , () => {console .log ("数据接收成功" );emit ("connection" ); console .log ("程序执行完毕" );
9. 模块系统
图片来自菜鸟教程
在路径 Y 下执行 require(X)语句执行顺序:
如果 X 是内置模块,直接加载内置模块
如果 X 以’/‘开头,设置 Y 为文件根路径
如果 X 以’./‘或’/‘或’../‘开头
a. load_as_file(Y + X)
b. load_as_directory(Y + X)
寻找当前路径下有没有 node_modules 文件夹
a. 有,查看 node_modules 文件夹中有无要加载的模块
b. 没有,回到上一级查看有没有 node_modules 文件夹,直到回到项目根目录为止
抛出异常”not found”
load_as_file(X):
如果 X 是一个文件,将 X 作为 JavaScript 文本加载
如果 X.js 是一个文件,将 X.js 作为 JavaScript 文本加载
如果 X.json 是一个文件,解析 X.json 为 JavaScript 对象并加载
如果 X.node 是一个文件,将 X.node 作为二进制插件加载
load_as_directory(Y + X):
如果 X/package.json 是一个文件
a. 解析 X/package.json,并查找”main”字段
b. let M = X + (json main 字段)
c. load_as _file(M)
d. load_index(M)
load_index(X)
load_index(X):
如果 X/index.js 是一个文件,将 X/index.js 作为 JavaScript 文本加载
如果 X/index.json 是一个文件,解析 X/index.json 为 JavaScript 对象并加载
如果 X/index.node 是一个文件,将 X/index.node 作为二进制插件加载
10. web 模块
使用 Node 创建 web 服务器
1 2 3 4 5 6 7 8 9 10 11 12 13 14 15 16 17 18 19 20 21 22 23 24 const http = require ("http" );const fs = require ("fs" );createServer ((req, res ) => {readFile (__dirname + "/index.html" , (err, data ) => {if (err) {throw err;else {writeHead (200 , {"Contnet-Type" : "text/html" ,write (data.toString ());end ();listen (9090 , (err ) => {if (err) {throw err;else {console .log ("http://localhost:9090" );
在该目录下创建一个 index.html 文件
1
2
3
4
5
6
7
8
9
10
11
12
13
14
<!DOCTYPE html > <html lang ="en" > <head > <meta charset ="UTF-8" /> <meta http-equiv ="X-UA-Compatible" content ="IE=edge" /> <meta name ="viewport" content ="width=device-width, initial-scale=1.0" /> <title > Server</title > </head > <body > <h2 > CLZ</h2 > <p > CZH</p > </body > </html >
执行 server.js 文件
使用 Node 创建 web 客户端
1
2
3
4
5
6
7
8
9
10
11
12
13
14
15
16
17
18
19
20
21
22
23
const http = require ("http" );const options = {host : "localhost" ,port : "9090" ,path : "/index.html" ,const callback = function (res ) {let body = "" ;on ("data" , function (data ) {on ("end" , function (console .log (body);const req = http.request (options, callback);end ();
新开一个终端 , 执行 client.js 文件
11. Express 框架 Express 框架的核心特性:
可以设置中间件来响应 HTTP 请求
定义了路由表用于执行不同的 HTTP 请求
可以通过模板传递参数来动态渲染 HTML 页面
11.1 安装 几个重要的模块
body-parser : node.js 中间件,用于处理 JSON, Raw, Text 和 URL 编码的数据cookie-parser : 解析 Cookie 的工具,通过 req.cookies 可以取到传过来的 cookie,并将它们转化为对象multer : node.js 中间件,用于处理 enctype=”multipart/form-data”(设置表单的 MIME 编码)的表单数据
11.2 Express 框架实例 实例 1:
1
2
3
4
5
6
7
8
9
10
11
12
13
14
const express = require ("express" );const app = express ();get ("/" , (req, res ) => {send ("Hello World!" );const server = app.listen (9090 , "localhost" , function (let host = server.address ().address ;let port = server.address ().port ;console .log (server.address ());console .log ("http://%s:%s" , host, port);
执行以上代码后,在浏览器中访问 http://localhost:9090/
实例 2(路由):
1
2
3
4
5
6
7
8
9
10
11
12
13
14
15
16
17
18
const express = require ("express" );const app = express ();get ("/" , function (req, res ) {send ("Hello" );get ("/list_user" , function (req, res ) {send ("用户列表页面" );get ("/ab*cd" , function (req, res ) {send ("正则匹配" );const server = app.listen (9090 , function (console .log ("http://localhost:9090" );
实例 3(静态资源):
1
2
3
4
5
6
7
8
9
10
11
12
const express = require ("express" );const app = express ();use (express.static ("public" )); get ("/" , function (req, res ) {send ("Hello" );const server = app.listen (9090 , function (console .log ("http://localhost:9090" );
12. MySQL 12.1 安装驱动 12.2 简单连接使用数据库 1 2 3 4 5 6 7 8 9 10 11 12 13 14 15 16 const mysql = require ("mysql" );const connection = mysql.createConnection ({host : "localhost" ,user : "root" ,password : "******" , database : "node_mysql" ,connect ();query ("select 1 + 1 as solution" , function (err, results, fields ) {if (err) {throw err;console .log ("The solution is: " + results[0 ].solution );
参考:Node.js 教程 | 菜鸟教程 (runoob.com)